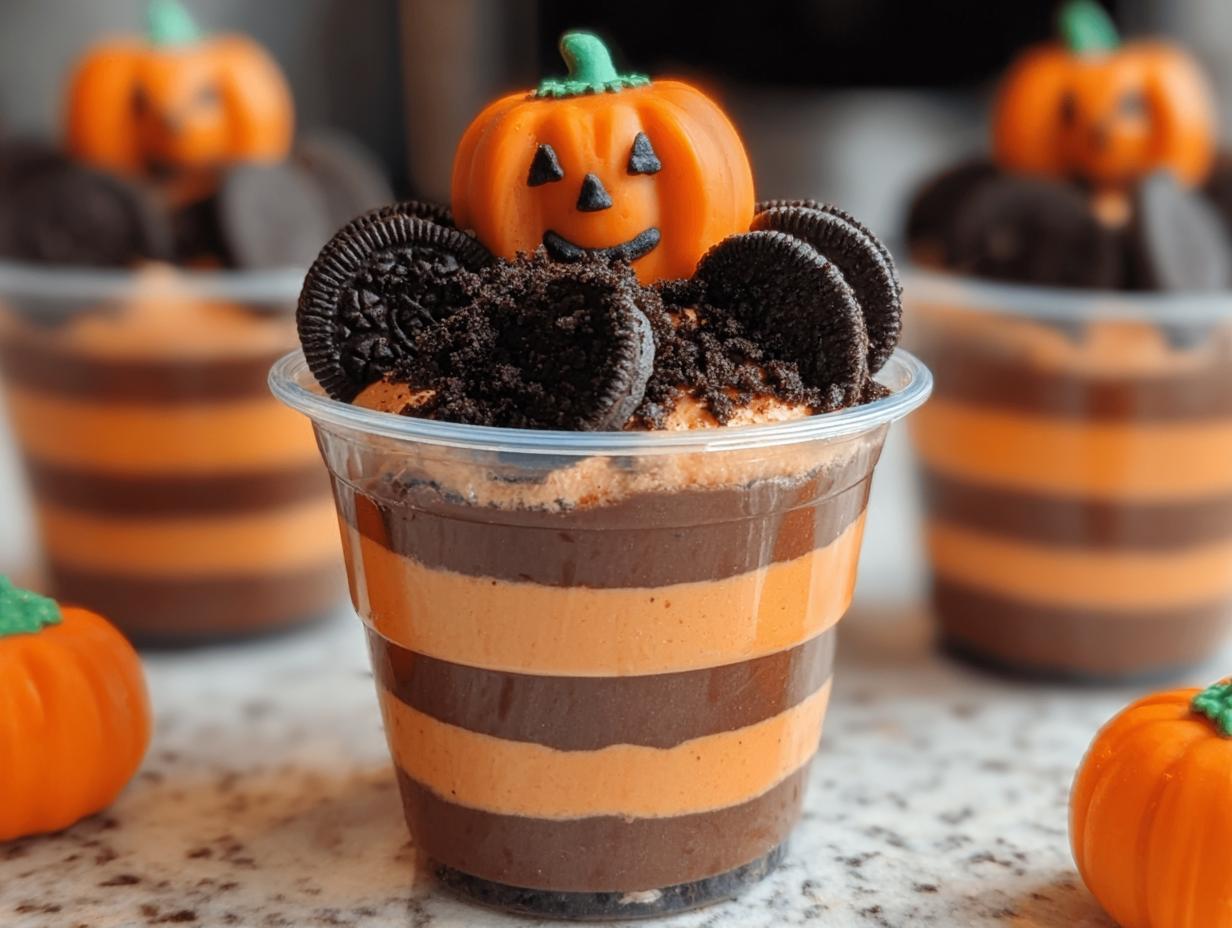
Pumpkin Patch Dirt Cups have become my absolute favorite fall treat, bringing such joy to our family gatherings. I remember the first time I made them for my niece’s Halloween party – the look on her face when she saw the little candy pumpkins peeking out from the chocolate “dirt” was priceless! These easy pumpkin patch dirt cups are so simple to whip up, and the creamy pudding mixed with crunchy cookie crumbs is just heavenly. They’re the perfect way to capture that cozy feeling of a crisp autumn day. Let’s get cooking!
Why You’ll Love These Pumpkin Patch Dirt Cups
- The taste is pure chocolatey bliss with a delightful cookie crunch that everyone adores.
- You’ll be amazed at how quickly these come together – a true testament to their easy pumpkin patch dirt cups status.
- They’re a wonderfully budget-friendly dessert, perfect for feeding a crowd without breaking the bank.
- These are incredibly kid friendly pumpkin patch cups, making them a hit at any children’s party.
- The no-bake method means less time in the kitchen and more time enjoying the season.
- As a fall themed dirt cups option, they perfectly capture the spirit of autumn gatherings.
- They are a fantastic choice for a kid friendly pumpkin patch cups activity, letting little hands help decorate.
- You get all the fun of a themed dessert with minimal effort.
Ingredients for Pumpkin Patch Dirt Cups
Gathering your ingredients for these delightful pumpkin patch chocolate pudding cups is super simple. You’ll need:
- 1 package (15.25 oz) chocolate sandwich cookies – about 24–28 cookies, crushed into fine crumbs for the perfect dirt base.
- 1 box (3.9 oz) instant chocolate pudding mix – the key to that rich, creamy flavor you expect in dirt cup desserts.
- 2 cups cold milk – essential for mixing the pudding to the right consistency.
- 1 tub (8 oz) whipped topping, thawed – this makes our pudding light, fluffy, and extra decadent.
- 12–16 candy pumpkins – these are the stars of our pumpkin patch, adding a festive touch.
- Green candy melts, sprinkles, or licorice (optional) – for adding cute vines or grass details to your pumpkin patch dessert cups.
- Clear plastic cups (8–9 oz size) – so you can see all those yummy layers!
How to Make Pumpkin Patch Dirt Cups
- Step 1: Start by crushing your chocolate sandwich cookies. You can do this in a food processor until they’re fine crumbs, or place them in a zip-top bag and use a rolling pin for a bit of a workout! Set aside about 2 tablespoons of these crumbs for the top layer.
- Step 2: In a medium bowl, whisk together the instant chocolate pudding mix and the cold milk. Keep whisking for about 2 minutes until it starts to thicken nicely. Let this pudding mixture sit for about 5 minutes to fully set up.
- Step 3: Now, gently fold the thawed whipped topping into the thickened pudding. Be tender with it; you want to keep the mixture light and fluffy, creating a wonderfully creamy texture.
- Step 4: Begin assembling your pumpkin patch dirt cups. Spoon a layer of the crushed cookie crumbs into the bottom of each clear plastic cup. This forms the base of our delicious dessert.
- Step 5: Add a generous layer of the chocolate pudding mixture over the cookie crumbs. Make sure to spread it evenly for a beautiful presentation.
- Step 6: Continue the layering process. Add another layer of cookie crumbs, followed by more pudding. Keep going until your cups are almost full. This is where how to assemble pumpkin patch dirt cups really starts to shine!
- Step 7: Finish the layering by topping each cup with a final, generous sprinkle of the reserved cookie crumbs. This creates that perfect “dirt” look for our pumpkin patch theme.
- Step 8: Time for the fun decorations! Gently press a candy pumpkin into the center of the “dirt” on each cup. This is the highlight of how to assemble pumpkin patch dirt cups and makes them instantly recognizable.
- Step 9: If you like, add some optional “vines” or “grass” using green sprinkles, melted green candy melts drizzled on top, or thin strips of green licorice. These finishing touches really elevate the fall themed dirt cups.
- Step 10: For the best texture and to allow the flavors to meld, refrigerate the assembled pumpkin patch dirt cups for at least 30 minutes before serving. This ensures they are perfectly chilled and set.

Pro Tips for the Best Pumpkin Patch Dirt Cups
I’ve learned a few tricks over the years to make these pumpkin patch dirt cups absolutely perfect. Follow these tips for the best results:
- For the best “dirt” texture, pulse your chocolate sandwich cookies in a food processor until they resemble fine sand. If you don’t have one, a zip-top bag and a rolling pin work great – just be sure to get them finely crushed.
- Don’t overmix the pudding and whipped topping. Gently folding them together preserves the airiness, resulting in a lighter, fluffier filling for your pumpkin patch dessert cups.
- Chill your cups for at least 30 minutes before serving. This allows the pudding to set up properly, preventing a soupy dessert and making them easier to handle.
- Add your candy pumpkins and any delicate decorations just before serving. This prevents them from getting sticky or sinking too much into the “dirt.”
What’s the secret to perfect pumpkin patch dessert cups?
The secret to truly perfect pumpkin patch dessert cups is the ratio of pudding to whipped topping, and ensuring your cookie crumbs are finely crushed. This combination creates that classic, satisfying dirt cup texture that makes it the best pumpkin patch dirt cup recipe. For more dessert inspiration, check out our easy chocolate chip cookies recipe.
Can I make pumpkin patch pudding cups ahead of time?
Yes, you absolutely can! You can assemble these pumpkin patch pudding cups up to 24 hours in advance. Store them covered in the refrigerator. For best results, add the candy pumpkins right before serving to keep them looking their best.
How do I avoid common mistakes with DIY pumpkin patch dirt cups?
A common mistake is not crushing the cookies finely enough, which can lead to chunky “dirt.” Also, be careful not to overmix the pudding and whipped topping, as this can make the filling dense. Finally, remember to chill them adequately before serving! For more tips on making desserts ahead of time, you might find our guide on make-ahead meals helpful.
Best Ways to Serve Pumpkin Patch Dirt Cups
These delightful fall themed dirt cups are perfect for so many occasions! For a Halloween party, serve them as individual treats at each place setting, perhaps with a spooky napkin or a mini plastic spider. They also make a charming addition to a Thanksgiving dessert table, offering a fun, lighter option alongside pies. For a casual family gathering, simply line them up on a tray and let everyone grab their own. They pair wonderfully with a crisp apple cider or a warm mug of spiced tea, enhancing that cozy autumnal vibe. If you’re looking for other festive fall treats, consider our caramel apple muffins.
Nutrition Facts for Pumpkin Patch Dirt Cups
When you’re making these fun fall themed dirt cups, it’s good to have an idea of what’s in each serving. These numbers help you understand the nutritional profile of this delightful treat.
- Calories: 310
- Fat: 14g
- Saturated Fat: 6g
- Protein: 4g
- Carbohydrates: 42g
- Fiber: 2g
- Sugar: 28g
- Sodium: 240mg
Nutritional values are estimates for these pumpkin patch dessert cups and may vary based on specific ingredients used. For more information on understanding nutrition labels, you can refer to resources like the FDA’s guide.
How to Store and Reheat Pumpkin Patch Dirt Cups
Once your delightful pumpkin patch layered pudding cups are assembled and chilled, you’ll want to store them properly to keep them fresh. I usually let them cool completely before covering them tightly with plastic wrap. You can store these DIY pumpkin patch dirt cups in the refrigerator for up to 3–4 days. They hold up really well, making them a fantastic make-ahead option for parties.
If you need to store them for longer, they also freeze beautifully! For freezer storage, wrap each cup individually in plastic wrap, then in aluminum foil, and place them in a freezer-safe container. They’ll keep for about 3 months. To enjoy frozen pumpkin patch dessert cups, thaw them overnight in the refrigerator. Reheating isn’t typically necessary as they are best served chilled, but if you prefer them slightly less cold, a brief 10-15 second microwave zap (carefully!) can work for individual servings.

Frequently Asked Questions About Pumpkin Patch Dirt Cups
What are pumpkin patch dirt cups?
Pumpkin patch dirt cups are a fun, no-bake dessert made to resemble a miniature pumpkin patch. They typically feature layers of chocolate pudding and crushed chocolate cookies (the “dirt”), with candy pumpkins and sometimes green sprinkles for “vines” or “grass” on top. They’re a creative way to enjoy a classic dirt cup, making them perfect for fall parties.
Can I use other types of pudding for these pumpkin patch dessert cups?
Absolutely! While chocolate is classic for the “dirt” effect, you can certainly experiment with other flavors. Vanilla pudding layered with crushed vanilla wafers would give a lighter look, or even a butterscotch pudding could work for a different twist on these fall themed dirt cups. Just ensure you use instant pudding mixes according to package directions for the best texture.
How do I make these kid friendly pumpkin patch cups even more festive?
To make these kid friendly pumpkin patch cups extra festive, get creative with your decorations! You can add gummy worms peeking out of the “dirt,” use edible glitter for a magical touch, or even place small candy ghosts alongside the pumpkins. Some people also like to add a layer of green-tinted whipped cream at the bottom before the cookie crumbs to create a grassy base, making them even more like a true pumpkin patch. For more fun party ideas, explore our easy family dinners.
What are some good alternatives to chocolate sandwich cookies for the dirt layer?
If you’re looking for alternatives to chocolate sandwich cookies for your pumpkin patch cookie crumb cups, you have a few great options! Crushed graham crackers or vanilla wafers work well for a lighter “dirt” color, or you could even use crushed chocolate wafers for a similar flavor profile. For a gluten-free version, consider using gluten-free chocolate sandwich cookies or finely crushed gluten-free graham crackers. You can find more gluten-free cookie recipes here.
Variations of Pumpkin Patch Dirt Cups You Can Try
These pumpkin patch dirt cups are so versatile, and I love experimenting with different twists! They’re fantastic pumpkin patch dessert ideas for kids that can be adapted for all sorts of preferences and dietary needs. Here are a few of my favorite variations for these fun fall themed dirt cups:
- Gluten-Free Patch: Easily make these DIY pumpkin patch dirt cups gluten-free by using your favorite gluten-free chocolate sandwich cookies or cookies that have been crushed into fine crumbs. This is a simple swap that makes them accessible for everyone.
- White Chocolate Ghostly Patch: Instead of chocolate pudding, try using instant white chocolate pudding for a lighter base. Top with crushed vanilla wafers and candy ghosts instead of pumpkins for a spooky, spectral twist on these pumpkin patch pudding cups.
- Dairy-Free Delight: For a dairy-free version of these pumpkin patch dessert cups, use dairy-free chocolate sandwich cookies and a dairy-free chocolate pudding mix. Thawed dairy-free whipped topping or coconut cream works wonderfully as a substitute for the whipped topping.
- Mini Muffin Tin Patch: For bite-sized treats, press the cookie crumbs and pudding into mini muffin liners. This is a cute way to present these kid friendly pumpkin patch cups at parties, and they’re perfect for little hands.

Pumpkin Patch Dirt Cups: 8 Festive Delights
- Total Time: 45 minutes
- Yield: 6–8 cups 1x
- Diet: Vegetarian
Description
Irresistible Pumpkin Patch Dirt Cups are the easiest Halloween dessert recipe. These no-bake treats feature layers of creamy chocolate pudding, crushed chocolate sandwich cookies, and festive candy pumpkins, making them a fun and kid-friendly option for Halloween parties and fall gatherings.
Ingredients
- 1 package (15.25 oz) chocolate sandwich cookies (about 24–28 cookies)
- 1 box (3.9 oz) instant chocolate pudding mix
- 2 cups cold milk
- 1 tub (8 oz) whipped topping, thawed
- 12–16 candy pumpkins
- Green candy melts, sprinkles, or licorice (optional, for “vines”)
- Clear plastic cups (8–9 oz size)
Instructions
- Crush the chocolate sandwich cookies into fine crumbs using a food processor or a zip-top bag and rolling pin. Set aside about 2 tablespoons for topping.
- In a bowl, whisk together the instant chocolate pudding mix and cold milk for 2 minutes until thick. Let sit for 5 minutes to set.
- Gently fold the thawed whipped topping into the pudding mixture until light and fluffy.
- Spoon a layer of crushed cookie crumbs into the bottom of each clear plastic cup.
- Add a layer of the pudding mixture over the cookie crumbs.
- Repeat the layers of cookie crumbs and pudding until the cups are nearly full.
- Finish with a generous sprinkle of the reserved cookie crumbs on top to create the “dirt” layer.
- Decorate each cup by pressing a candy pumpkin into the center of the “dirt.”
- Add optional “vines” or “grass” using green sprinkles, candy melts, or licorice strips.
- Refrigerate the assembled pumpkin patch dirt cups for at least 30 minutes before serving to allow them to set.
Notes
- For a cleaner look, avoid overfilling the cups, leaving room for decorations.
- To prevent candy pumpkins from becoming sticky, add them just before serving.
- Consider using gluten-free sandwich cookies or dairy-free pudding mix for allergy-friendly versions.
- Get creative with additional toppings like gummy worms, candy eyes, or ghost toppers for extra spooky fun.
- Prep Time: 15 minutes
- Cook Time: 0 minutes
- Category: Dessert, Halloween
- Method: No-Bake
- Cuisine: American
Nutrition
- Serving Size: 1 cup
- Calories: 310
- Sugar: 28g
- Sodium: 240mg
- Fat: 14g
- Saturated Fat: 6g
- Unsaturated Fat: 6g
- Trans Fat: 0g
- Carbohydrates: 42g
- Fiber: 2g
- Protein: 4g
- Cholesterol: 10mg
Keywords: Pumpkin Patch Dirt Cups, pumpkin patch dessert cups, pumpkin dirt cup recipe, Halloween pumpkin patch cups, easy pumpkin patch dirt cups, how to make pumpkin patch dirt cups, pumpkin patch pudding cups, fall themed dirt cups, kid friendly pumpkin patch cups, best pumpkin patch dirt cup recipe, pumpkin patch chocolate pudding cups, DIY pumpkin patch dirt cups, pumpkin patch cookie crumb cups, autumnal pumpkin patch dirt cups, pumpkin patch dessert ideas for kids, pumpkin patch treat cups recipe, dirt cup desserts fall theme, pumpkin patch layered pudding cups, how to assemble pumpkin patch dirt cups, pumpkin patch dirt cup ingredients