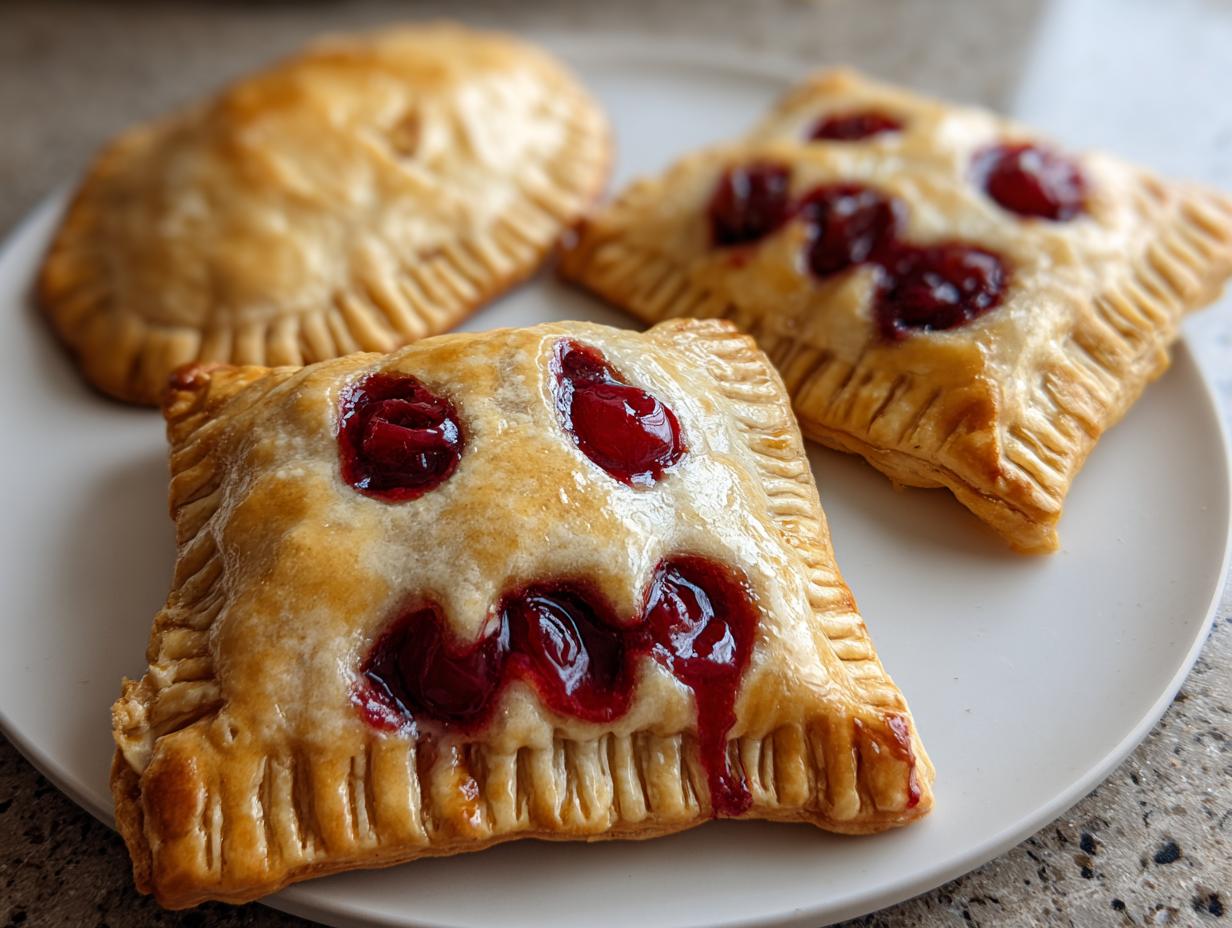
Hand pies have a way of transporting me right back to summer afternoons spent at my grandmother’s house. The aroma of sweet, bubbling cherries filling her kitchen was pure magic. These delightful little pastry pockets, also known as mini pies, are just as special today. They’re perfect for any occasion, from a sunny picnic to a cozy afternoon tea. I’ve found that making these easy hand pie recipes is a joy, and the result is always a hit. Let’s get cooking!
Why You’ll Love These Hand Pies
You’re going to adore these delightful little treats for so many reasons. They’re incredibly easy to whip up, making them perfect for busy weeknights or spontaneous gatherings.
- The taste of sweet, warm cherries encased in flaky pastry is absolutely divine.
- You can have these delicious treats ready in under an hour, thanks to the simple recipe.
- They’re a more wholesome option than many store-bought desserts, especially when you control the ingredients.
- Making these small pies is a budget-friendly way to enjoy a special dessert.
- The kids will go wild for these, making them a fantastic family-friendly activity.
- These portable pies are perfect for picnics, lunchboxes, or enjoying on the go.
- You can customize the filling to create your own unique flavors, making these small pies endlessly versatile.
Ingredients for Delicious Hand Pies
Gathering the right ingredients is the first step to making these irresistible sweet hand pies. The cherry filling is bursting with flavor, and the crust is a dream of flakiness.
- 2 cups pitted fresh or frozen cherries – I love using frozen ones for convenience; just make sure they’re thawed!
- 1/4 cup granulated sugar – this sweetens the cherries perfectly.
- 1 tablespoon cornstarch – this is our secret to a wonderfully thick filling that won’t run out.
- 1 tablespoon lemon juice – a little acidity brightens up the cherry flavor beautifully.
- 1/2 teaspoon vanilla extract – for that classic warm, comforting aroma and taste.
- 2 1/2 cups all-purpose flour – the foundation of our flaky crust.
- 1 teaspoon salt – balances the sweetness and enhances the flavors.
- 1 tablespoon sugar (optional) – for a hint of sweetness in the crust itself.
- 1 cup unsalted butter, cold and cubed – the key to that incredibly flaky texture! Make sure it’s really cold.
- 6–8 tablespoons ice water – just enough to bring the dough together.
- 1 egg (for egg wash) – this gives our pies that gorgeous golden sheen.
- Coarse sugar for sprinkling (optional) – for a delightful crunch on top.
How to Make Perfect Hand Pies
Making these delightful hand pies is a rewarding process, and the results are simply delicious. Follow these steps for perfectly flaky, fruit-filled pastry pockets.
- Step 1: Make the filling. In a medium saucepan, combine 2 cups pitted fresh or frozen cherries, 1/4 cup granulated sugar, 1 tablespoon cornstarch, and 1 tablespoon lemon juice. Cook over medium heat, stirring gently, until the mixture thickens and bubbles, which usually takes about 5–7 minutes. You’ll notice it becomes glossy and coats the back of a spoon. Remove from heat and stir in 1/2 teaspoon vanilla extract. Let this glorious cherry mixture cool completely before proceeding; this is crucial to prevent the dough from melting.
- Step 2: Prepare the crust. In a large bowl, whisk together 2 1/2 cups all-purpose flour, 1 teaspoon salt, and the optional 1 tablespoon sugar. Cut in 1 cup unsalted butter, cold and cubed, using a pastry blender or your fingertips until the mixture resembles coarse crumbs with some pea-sized pieces of butter remaining. Gradually add 6–8 tablespoons ice water, one tablespoon at a time, mixing until the dough just comes together. Don’t overmix! Divide the dough in half, flatten each into a disk, wrap in plastic, and chill for at least 30 minutes.
- Step 3: Roll and cut. Preheat your oven to 375°F (190°C). Line a baking sheet with parchment paper. On a lightly floured surface, roll out one disk of dough to about ⅛-inch thickness. Use a 4-inch round cutter to cut out circles. Gather the scraps, re-roll, and cut more circles. Repeat with the second disk of dough. This is where your baked hand pies start to take shape!
- Step 4: Fill and seal. Spoon about 1–2 tablespoons of the cooled cherry filling onto one half of each dough circle, leaving a small border. Moisten the edges of the dough circles with a little water. Fold the other half of the dough over the filling to create a half-moon shape. Press the edges firmly with your fingers, then use a fork to crimp and seal them securely. This ensures your delicious filling stays inside your hand pies.
- Step 5: Bake. Place the prepared hand pies onto the parchment-lined baking sheet. In a small bowl, whisk the 1 egg for the egg wash. Lightly brush the tops of the pies with the egg wash, and if desired, sprinkle with coarse sugar for an extra sparkle and crunch. Cut a few small slits in the top of each pie to allow steam to escape during baking. Bake for 20–25 minutes, or until the crust is beautifully golden brown and the filling is bubbling. These baked hand pies will fill your kitchen with an amazing aroma.
- Step 6: Cool and serve. Carefully transfer the hot hand pies to a wire rack to cool for at least 10 minutes before serving. This allows the filling to set properly. Enjoy them warm for the best texture and flavor, or let them cool completely for a perfect portable treat.

Pro Tips for the Best Hand Pies
Want to elevate your hand pies from good to absolutely amazing? I’ve picked up a few tricks over the years that make all the difference in achieving that perfect flaky crust and delightful filling.
- Always use very cold butter and ice water for your crust. This is non-negotiable for flakiness!
- Chill the dough thoroughly after making it. This relaxes the gluten, making it easier to roll and preventing shrinkage.
- Don’t overwork the dough! Mix just until it comes together. Too much handling develops gluten, leading to tough pastry.
- Ensure your fruit filling is completely cool before assembling the pies. A warm filling will melt the butter in the dough, ruining the texture.
What’s the secret to perfect flaky crust for hand pies?
The absolute secret is keeping everything super cold – the butter, the water, even your hands if possible! Those little pockets of cold butter create steam as they bake, pushing apart the dough layers to form those coveted flakes in your pastry pockets. For more on the science of baking, check out this guide on copycat recipes.
Can I make hand pies ahead of time?
Yes, you absolutely can! You can prepare the dough and filling a day in advance and store them separately in the fridge. You can also assemble the pies and freeze them before baking. Just bake them from frozen, adding a few extra minutes to the cooking time. If you’re looking for other make-ahead meal ideas, explore these cold lunch ideas for adults.
How do I avoid common mistakes with hand pies?
A common pitfall is overfilling, which causes leaks. Be sure to only use 1-2 tablespoons of filling per pie. Another mistake is not sealing the edges properly; always crimp firmly with a fork. Lastly, don’t forget to cut vents in the top to let steam escape!
Best Ways to Serve Hand Pies
These delightful hand pies are incredibly versatile and can be served in so many wonderful ways. They’re perfect on their own, but pairing them with the right accompaniments really makes them shine.
For a classic dessert experience, serve them warm with a scoop of vanilla bean ice cream. The contrast between the warm, flaky pastry and the cold, creamy ice cream is simply divine. Another fantastic option is to pair them with a dollop of freshly whipped cream and a sprinkle of powdered sugar. If you’re looking for something a bit different, these dessert pockets are also lovely with a light fruit salad or yogurt for a more refreshing treat. They’re also perfect for picnics or packed lunches, offering a sweet ending to any meal. For more dessert inspiration, try these easy chocolate chip cookies.
Nutrition Facts for Hand Pies
Here’s a breakdown of the estimated nutritional information for one of these delightful hand pie. Keep in mind that these values can vary slightly based on the exact ingredients and portion sizes you use.
- Serving Size: 1 hand pie
- Calories: 280
- Fat: 16g
- Saturated Fat: 10g
- Unsaturated Fat: 5g
- Trans Fat: 0g
- Carbohydrates: 32g
- Fiber: 2g
- Sugar: 14g
- Protein: 3g
- Sodium: 140mg
- Cholesterol: 40mg
Nutritional values are estimates and may vary based on specific ingredients and preparation methods used. For more healthy eating tips, consider these 3 foods you should eat less of to stay healthy.

How to Store and Reheat Hand Pies
Once your delicious hand pies have cooled, proper storage is key to keeping them fresh and tasty. For enjoying them within a few days, place completely cooled pies in an airtight container. You can store them at room temperature for up to 2 days, or in the refrigerator for 3-4 days. If you want to keep these wonderful portable pies for longer, freezing is your best bet. Wrap each cooled pie individually in plastic wrap, then place them in a freezer-safe bag or container. They’ll keep beautifully in the freezer for up to 3 months.
Reheating is simple! For pies stored in the fridge, you can warm them gently in a 300°F (150°C) oven for about 5-10 minutes until heated through. If reheating from frozen, bake them at the same temperature for 15-20 minutes, or until the crust is crisp and the filling is warm. This makes enjoying these homemade treats a breeze, anytime! For more easy dinner ideas, check out these easy family dinners.
Frequently Asked Questions About Hand Pies
Can I use store-bought pie crust for hand pies?
Absolutely! While making your own crust is rewarding, using a good quality store-bought pie crust is a fantastic shortcut for these homemade hand pies. Just follow the package directions for thawing and handling. It’s a great way to save time and still get delicious results.
What are the best fillings for hand pies besides fruit?
While fruit fillings are classic, the possibilities are endless! You can make delightful savory hand pies with fillings like seasoned ground meat, chicken pot pie filling, or even spinach and feta. For sweet options beyond fruit, try a creamy cheesecake filling, chocolate ganache, or a simple spiced apple butter. Getting creative with fillings is part of the fun of making your own hand pies!
How do I get my hand pies to seal properly?
The key to a good seal is a slightly moist edge and firm pressure. Lightly brush the edge of your bottom crust with water or an egg wash before placing the top crust on. Then, press firmly with your fingers all around the edge. Using a fork to crimp the edges not only seals them securely but also adds a pretty decorative touch to your homemade hand pies.
Why do my hand pies sometimes leak?
Leaking usually happens for a couple of reasons: overfilling the pies or not sealing the edges tightly enough. Make sure you’re using only about 1-2 tablespoons of filling per pie, leaving a decent border. Also, ensure those edges are pressed down really well, and don’t forget to cut those essential steam vents in the top crust. These steps help manage the filling and steam during baking, preventing blowouts in your hand pies.
Variations of Hand Pies You Can Try
The beauty of hand pies is their incredible versatility! Once you’ve mastered the basic cherry version, you can explore a whole world of flavors and dietary options. These little gems are perfect for experimenting.
- Fruit Hand Pies: Beyond cherry, think about classic apple, tangy raspberry, sweet blueberry, or even a mix of mixed berries. Seasonal fruits make the best fillings!
- Savory Hand Pies: Don’t limit yourself to sweets! Try fillings like seasoned ground beef or lamb, shredded chicken with vegetables, spinach and feta cheese, or even a hearty mushroom and onion mix. These make for a fantastic lunch or light dinner.
- Dietary Variations: Need gluten-free? Use your favorite gluten-free pie crust. For a vegan option, ensure your crust uses vegetable shortening or vegan butter and omit the egg wash, or use a plant-based milk instead.
- Cooking Method: While these are typically baked hand pies, you could also try air-fried versions for extra crispiness, or even a small batch of deep-fried pies for a special treat.

Flaky Hand Pies: 6 Amazing Tips
- Total Time: 55 minutes
- Yield: 10-12 hand pies 1x
- Diet: Vegetarian
Description
These Easy Cherry Hand Pies offer a delightful taste of summer with sweet, juicy cherries encased in flaky, golden pie crust. Perfect for picnics, brunch, or as a portable dessert, these homemade hand pies are simple to prepare and wonderfully nostalgic.
Ingredients
- For the Cherry Filling:
- 2 cups pitted fresh or frozen cherries
- 1/4 cup granulated sugar
- 1 tablespoon cornstarch
- 1 tablespoon lemon juice
- 1/2 teaspoon vanilla extract
- For the Crust:
- 2 1/2 cups all-purpose flour
- 1 teaspoon salt
- 1 tablespoon sugar (optional)
- 1 cup unsalted butter, cold and cubed
- 6–8 tablespoons ice water
- To Assemble:
- 1 egg (for egg wash)
- Coarse sugar for sprinkling (optional)
Instructions
- Make the filling: In a saucepan, combine cherries, sugar, lemon juice, and cornstarch. Cook over medium heat until thickened, about 5–7 minutes. Stir in vanilla and let cool completely.
- Prepare the crust: In a large bowl, mix flour, salt, and sugar. Cut in cold butter until crumbly. Gradually add ice water until dough holds together. Divide, wrap, and chill for 30 minutes.
- Roll and cut: Roll one dough half to ⅛-inch thickness. Cut into 4-inch circles. Repeat with remaining dough.
- Fill and seal: Spoon 1–2 tablespoons of filling onto half the circles. Top with remaining circles, press edges with fork to seal, and cut slits on top to vent.
- Bake: Place on parchment-lined baking sheet. Brush with egg wash, sprinkle with sugar, and bake at 375°F (190°C) for 20–25 minutes until golden.
- Cool and serve: Let cool on wire rack 10 minutes. Serve warm or store for later.
Notes
- Chill dough before rolling for best flakiness.
- Do not overfill—too much filling may leak during baking.
- Seal edges tightly with a fork to avoid gaps.
- Vent tops with small slits to release steam.
- Store in an airtight container for up to 2 days or freeze for longer storage.
- Prep Time: 30 minutes
- Cook Time: 25 minutes
- Category: Dessert, Pies
- Method: Baked
- Cuisine: American
Nutrition
- Serving Size: 1 hand pie
- Calories: 280
- Sugar: 14g
- Sodium: 140mg
- Fat: 16g
- Saturated Fat: 10g
- Unsaturated Fat: 5g
- Trans Fat: 0g
- Carbohydrates: 32g
- Fiber: 2g
- Protein: 3g
- Cholesterol: 40mg
Keywords: Hand Pies, Mini pies, Small pies, Individual pies, Portable pies, Dessert pockets, Sweet hand pies, Easy hand pie recipes, Homemade hand pies, Baked hand pies, Cherry hand pies