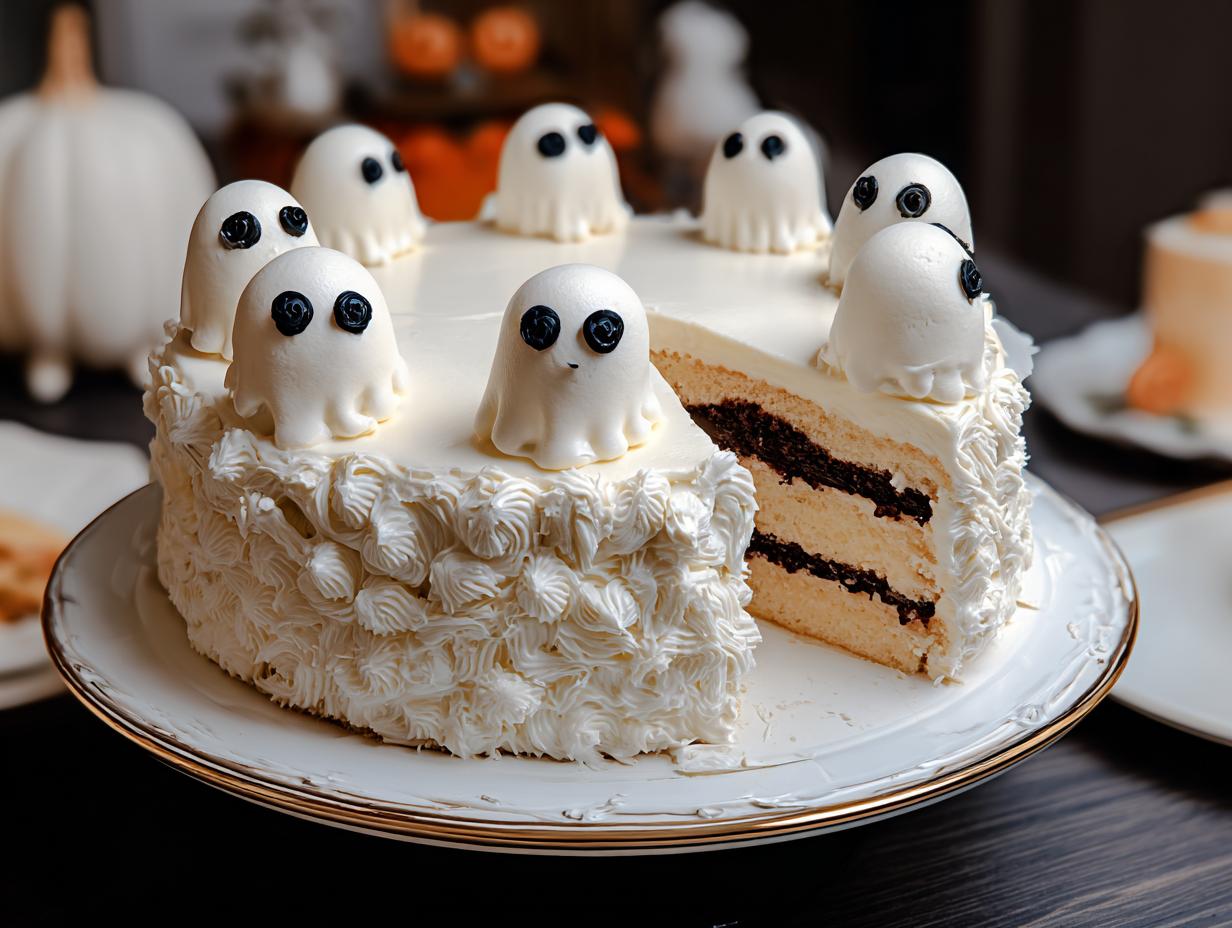
Ghost Cake has always been the star of my Halloween parties, and I’m so excited to share this recipe with you! There’s something magical about creating this ghostly confection – the sweet vanilla scent fills the kitchen, and the anticipation of that first bite is almost as fun as decorating it. This Halloween ghost cake recipe is surprisingly simple, making it perfect for beginners and seasoned bakers alike. Imagine a moist, tender cake topped with fluffy white frosting, transformed into a friendly specter. It’s a truly enchanting treat that will delight everyone, young and old. Let’s get cooking!
Why You’ll Love This Ghost Cake
- Incredibly moist and tender cake with a delightful vanilla flavor
- Surprisingly quick to prepare, making it perfect for weeknight treats
- A fun and engaging activity for the whole family to enjoy decorating
- Budget-friendly ingredients that won’t break the bank
- This spooky ghost dessert is sure to impress all your Halloween guests
- A crowd-pleasing dessert that’s a guaranteed hit at any party
- It’s a fantastic base for customization, fitting any Halloween themed cakes
- This delightful spooky ghost dessert brings smiles and enchantment to any celebration
Ingredients for Your Ghost Cake
Gather these simple ingredients to create your own ghostly confection. This recipe is perfect for exploring different white ghost cake ideas, offering a fantastic canvas for spooky creations.
- 2 ½ cups all-purpose flour – the foundation for a tender crumb
- 2 ½ teaspoons baking powder – for a lovely rise
- ½ teaspoon baking soda – helps with browning and texture
- 1 teaspoon salt – balances the sweetness
- 1 cup unsalted butter (room temperature) – essential for a creamy cake batter
- 1 ¾ cups granulated sugar – providing sweetness and moisture
- 4 large eggs – bind everything together
- 1 tablespoon vanilla extract – for that classic sweet flavor
- 1 cup whole milk or buttermilk – adds moisture and richness; buttermilk creates a slightly tangier, more tender cake
- For the Frosting:
- 1 cup unsalted butter (softened) – the base for our fluffy frosting
- 3–4 cups powdered sugar (sifted) – for sweetness and smooth texture
- 2 teaspoons vanilla extract – enhances the frosting’s flavor
- 2–3 tablespoons heavy cream or milk – to achieve the perfect spreadable consistency
- Pinch of salt – cuts through the sweetness
- For Decoration:
- Mini meringue or fondant ghosts – for that iconic spooky look
- Black edible gel or candy eyes – to give your ghosts personality
- Optional: white chocolate shavings or marshmallow fluff – for extra texture and ghostly appearance
How to Make a Ghost Cake
- Step 1: Let’s get this spooky party started! Preheat your oven to 350°F (175°C). Take a moment to properly grease and line two 6-inch or 8-inch round cake pans with parchment paper. This ensures your beautiful cake layers won’t stick, making removal a breeze.
- Step 2: In a medium bowl, whisk together the 2 ½ cups all-purpose flour, 2 ½ teaspoons baking powder, ½ teaspoon baking soda, and 1 teaspoon salt. This dry mixture forms the fluffy base of our cake.
- Step 3: Now for that creamy texture! In a large bowl, use an electric mixer to beat the 1 cup unsalted butter (room temperature) until it’s nice and creamy. Gradually add the 1 ¾ cups granulated sugar and beat until the mixture looks light and fluffy – you’ll see it get paler.
- Step 4: Time to add moisture and richness. One at a time, beat in the 4 large eggs, ensuring each is incorporated before adding the next. Then, mix in the 1 tablespoon vanilla extract for that classic, comforting aroma.
- Step 5: This is where we combine everything. Add the flour mixture in three parts, alternating with the 1 cup whole milk or buttermilk. Start and end with the flour mixture, mixing until just combined. Don’t overmix – we want a tender crumb!
- Step 6: Bake your cake layers. Divide the batter evenly between your prepared pans. Bake for 25–30 minutes, or until a toothpick inserted into the center comes out clean. The kitchen will start smelling wonderfully sweet! Let the layers cool in the pans for about 10 minutes before turning them out onto a wire rack to cool completely. This cooling process is crucial for easy frosting.

- Step 7: Let’s whip up that frosting! Beat the 1 cup unsalted butter (softened) in a bowl until it’s fluffy. Gradually add 3–4 cups powdered sugar (sifted), 2 teaspoons vanilla extract, and 2–3 tablespoons of heavy cream or milk. Beat until the frosting is smooth, creamy, and perfectly spreadable. Add a pinch of salt to balance the sweetness.
- Step 8: Assemble your masterpiece! Once the cake layers are completely cool, stack them with a generous layer of frosting in between. Then, frost the entire cake with a thick, smooth layer of white frosting. This is the base for our spooky creation.
- Step 9: Time for the fun part – decorating! Place your fondant or meringue ghosts around the cake. Use black edible gel or candy eyes to add cute, spooky expressions to your ghosts. This step is key to the easy ghost cake design. Following this ghost shaped cake tutorial will make it a breeze!
- Step 10: Chill and serve. Refrigerate your finished Ghost Cake for about 20 minutes before serving. This helps the frosting set, making it easier to slice and serve your delightful Halloween ghost cake recipe creation.
Pro Tips for the Best Ghost Cake
Want to make your spooky creation truly unforgettable? Here are a few tricks I’ve picked up that guarantee a fantastic Ghost Cake every time. These simple tips elevate your baking and decorating game!
- Always use room temperature ingredients for the cake batter. This ensures everything blends smoothly for that perfect, moist crumb.
- Don’t overmix the batter once you add the dry and wet ingredients. Overmixing develops gluten, leading to a tougher cake.
- For super smooth frosting, sift your powdered sugar. It makes a world of difference in texture and prevents lumps.
- Chill the frosted cake for about 15-20 minutes before decorating. This helps the frosting firm up, making it easier to add your ghost details without smudging.
What’s the secret to perfect Ghost Cake?
The real magic for a perfect Ghost Cake lies in the frosting consistency and the simple decorating technique. Using a smooth, slightly stiff buttercream frosting makes achieving that ghostly appearance effortless. It’s a truly easy ghost cake design that looks impressive!
Can I make Ghost Cake ahead of time?
Absolutely! You can bake the cake layers up to two days in advance and store them wrapped tightly at room temperature. Frost and decorate the cake the day you plan to serve it for the freshest look and taste. For more baking inspiration, check out these last recipes.
How do I avoid common mistakes with Ghost Cake?
Avoid overmixing the batter, as this leads to a dense cake. Also, ensure your cake layers are completely cool before frosting; a warm cake will melt your frosting, making decorating a messy disaster. Learn more about proper baking techniques on how to brine chicken, which can also apply to ensuring moist baked goods.
Best Ways to Serve Your Ghostly Confection
This delightful Ghost Cake is a showstopper on its own, but serving suggestions can make it even more special! For a truly festive presentation, serve slices of this spooky dessert alongside a scoop of vanilla bean ice cream or a dollop of whipped cream. The cool, creamy contrast is divine. You could also pair it with a warm beverage; think hot cocoa or spiced apple cider, especially if you’re serving this as part of a “Boo cake recipe” theme for a Halloween party. For a more elaborate dessert table, consider adding some festive Halloween fruit skewers or a bowl of popcorn for guests to enjoy. You might also enjoy these easy banana bread cookies as another sweet treat.
Nutrition Facts for Ghost Cake
This spooktacular Ghost Cake is a delightful treat, and here’s a breakdown of what you can expect per slice. Knowing the nutritional details helps when planning your festive spread!
- Serving Size: 1 slice
- Calories: 450
- Fat: 22g
- Saturated Fat: 14g
- Protein: 4g
- Carbohydrates: 60g
- Fiber: 2g
- Sugar: 45g
- Sodium: 300mg
Nutritional values are estimates and may vary based on specific ingredients used.
How to Store and Reheat Ghost Cake
Once your spooky Ghost Cake is baked and decorated, proper storage is key to keeping it fresh and delicious. Ensure the cake has cooled completely before storing it. For short-term storage, place the cake in an airtight container or cover it loosely with plastic wrap. This will keep it moist and prevent it from drying out in the refrigerator for up to 3–4 days. If you need to store it for longer, the unfrosted cake layers can be wrapped tightly in plastic wrap, then foil, and frozen for up to 3 months. This is a great way to prepare ahead for your Phantom cake recipe needs!
When you’re ready to enjoy your frozen cake, thaw the layers overnight in the refrigerator. For the frosted cake, if it needs a little refreshing, you can gently warm individual slices. Place a slice on a microwave-safe plate and heat for about 10–15 seconds on low power. Be careful not to overheat, as this can make the frosting melt too quickly. This quick reheat is perfect for enjoying a slice of your ghostly creation anytime!

Frequently Asked Questions About Ghost Cake
What’s the best way to achieve a ghostly appearance with this Ghost Cake?
For that perfect ghostly appearance, a smooth, thick layer of white buttercream frosting is your best friend. Apply it generously all over the cake, then use an offset spatula to create gentle, rounded curves to mimic a flowing gown. The key to fantastic spooky cake decorating is to keep the frosting relatively even, allowing the ghost shapes themselves to stand out. Don’t worry about perfection; a slightly wobbly ghost is just as charming!
Can I use different flavors for my Ghost Cake?
Absolutely! This recipe is incredibly versatile and serves as a wonderful base for many flavors. You can easily swap the vanilla cake for a chocolate, red velvet, or even a lemon cake recipe. When considering different flavor profiles, think about how they complement your ghostly dessert inspiration. A subtle spice cake could work wonderfully, or a rich chocolate cake provides a darker contrast to the white frosting, making the ghosts pop even more! For more flavor ideas, explore these honey lime chicken variations, as flavor experimentation is key in baking.
How do I make sure my Ghost Cake decorations look neat?
For neat decorations, ensure your cake is well-chilled before you start. This makes the frosting firm and easier to work with. When adding eyes and mouths with edible gel or candy, use a steady hand. If you’re piping frosting ghosts, practice on a piece of parchment paper first to get the consistency and shape just right. A steady hand and a chilled cake are your best tools for clean and impressive spooky cake decorating.
What are some other spooky cake decorating ideas for this Ghost Cake?
Beyond the classic ghosts, you can get creative with this cake! Consider adding edible glitter for a magical shimmer, or use black edible spray to create a gradient effect on the frosting for a more mysterious look. You could also sprinkle white chocolate shavings around the base to mimic wisps of fog, adding another layer to your ghostly dessert inspiration. Piping small, spooky cobwebs in the corners or using candy bats can also enhance the Halloween theme. You can find inspiration for other copycat recipes that might spark creativity.
Variations of Ghost Cake You Can Try
While the classic vanilla Ghost Cake is fantastic, don’t be afraid to get creative with these variations! Exploring different flavors and dietary options can lead to some truly unique Halloween themed cakes. Think about a rich chocolate cake base for a dramatic contrast, or a spiced pumpkin cake for a cozy autumn feel. These are wonderful ghostly bake ideas that cater to everyone.
- Dietary Adaptations: Easily create a gluten-free ghost cake by using your favorite gluten-free flour blend. For a dairy-free version, opt for plant-based milk and butter substitutes in both the cake and frosting.
- Flavor Twists: Try a red velvet cake for a vibrant surprise inside, or add a touch of citrus with a lemon or orange zest to the batter. A subtle peppermint extract in the frosting can also add a refreshing kick! For a different kind of sweet treat, check out this easy chocolate chip cookie recipe.
- Cupcake Ghosts: Don’t want a whole cake? Bake the batter in cupcake liners and decorate each one as a mini ghost for individual treats. This is a fantastic way to serve a crowd!
- No-Bake Option: For a quicker alternative, consider using store-bought pound cake or angel food cake as your base, cutting and stacking it into a ghost shape, and then frosting and decorating.

Ghost Cake: Your 1 frightfully easy recipe
- Total Time: 1 hour
- Yield: 10–12 slices 1x
- Diet: Vegetarian
Description
This Ghost Cake is the ultimate Halloween dessert centerpiece, featuring moist cake layers, creamy frosting, and playful ghost decorations. It’s spooky, sweet, and perfect for parties, bake sales, or family fun nights.
Ingredients
- For the Cake:
- 2 ½ cups all-purpose flour
- 2 ½ teaspoons baking powder
- ½ teaspoon baking soda
- 1 teaspoon salt
- 1 cup unsalted butter (room temperature)
- 1 ¾ cups granulated sugar
- 4 large eggs
- 1 tablespoon vanilla extract
- 1 cup whole milk or buttermilk
- For the Frosting:
- 1 cup unsalted butter (softened)
- 3–4 cups powdered sugar (sifted)
- 2 teaspoons vanilla extract
- 2–3 tablespoons heavy cream or milk
- Pinch of salt
- For Decoration:
- Mini meringue or fondant ghosts
- Black edible gel or candy eyes
- Optional: white chocolate shavings or marshmallow fluff
Instructions
- Preheat oven to 350°F (175°C). Grease and line two 6-inch or 8-inch round cake pans with parchment paper.
- Mix the dry ingredients. In a medium bowl, whisk together flour, baking powder, baking soda, and salt.
- Cream the butter and sugar. In a large bowl, use an electric mixer to beat the butter until creamy. Gradually add sugar and beat until light and fluffy.
- Add eggs and vanilla. One at a time, beat in the eggs. Mix in vanilla extract.
- Combine wet and dry. Add the flour mixture in three parts, alternating with milk. Begin and end with flour.
- Bake the cake. Divide batter evenly between pans and bake for 25–30 minutes, or until a toothpick inserted comes out clean. Let cool completely.
- Make the frosting. Beat the butter until fluffy. Gradually add powdered sugar, vanilla, and a bit of cream until the frosting is smooth and spreadable.
- Assemble the cake. Stack the cooled cake layers with a layer of frosting in between. Frost the entire cake with a thick, smooth layer of white frosting.
- Decorate. Place fondant or meringue ghosts around the cake. Use black gel or edible markers to add ghost eyes and mouths. You can pipe small dollops of frosting into ghost shapes as an alternative.
- Chill and serve. Refrigerate for 20 minutes before serving to help the frosting set.
Notes
- Use room temperature ingredients and avoid overmixing for a moist cake.
- Decorate with fondant ghosts, meringue ghosts, or piped frosting blobs.
- Consider a red velvet, chocolate, or pumpkin spice cake base for a flavor twist.
- Store the cake in the refrigerator for up to 3 days; freeze unfrosted layers for up to 2 months.
- Bake cake layers in advance and frost before serving for make-ahead convenience.
- Prep Time: 30 minutes
- Cook Time: 30 minutes
- Category: Dessert
- Method: Baked
- Cuisine: American
Nutrition
- Serving Size: 1 slice
Keywords: Ghost Cake, Ghostly confection, Spooky ghost dessert, Halloween ghost cake recipe, Easy ghost cake design, White ghost cake ideas, How to make a ghost cake, Ghost shaped cake tutorial, Boo cake recipe, Spooky cake decorating, Ghostly dessert inspiration, Halloween themed cakes, Ghostly bake ideas, Simple ghost cake, Ghost meringue cake, How to decorate a ghost cake, Ghostly appearance cake, Spooky cake for parties, Ghost cake tutorial for beginners, Ethereal ghost cake design, Phantom cake recipe