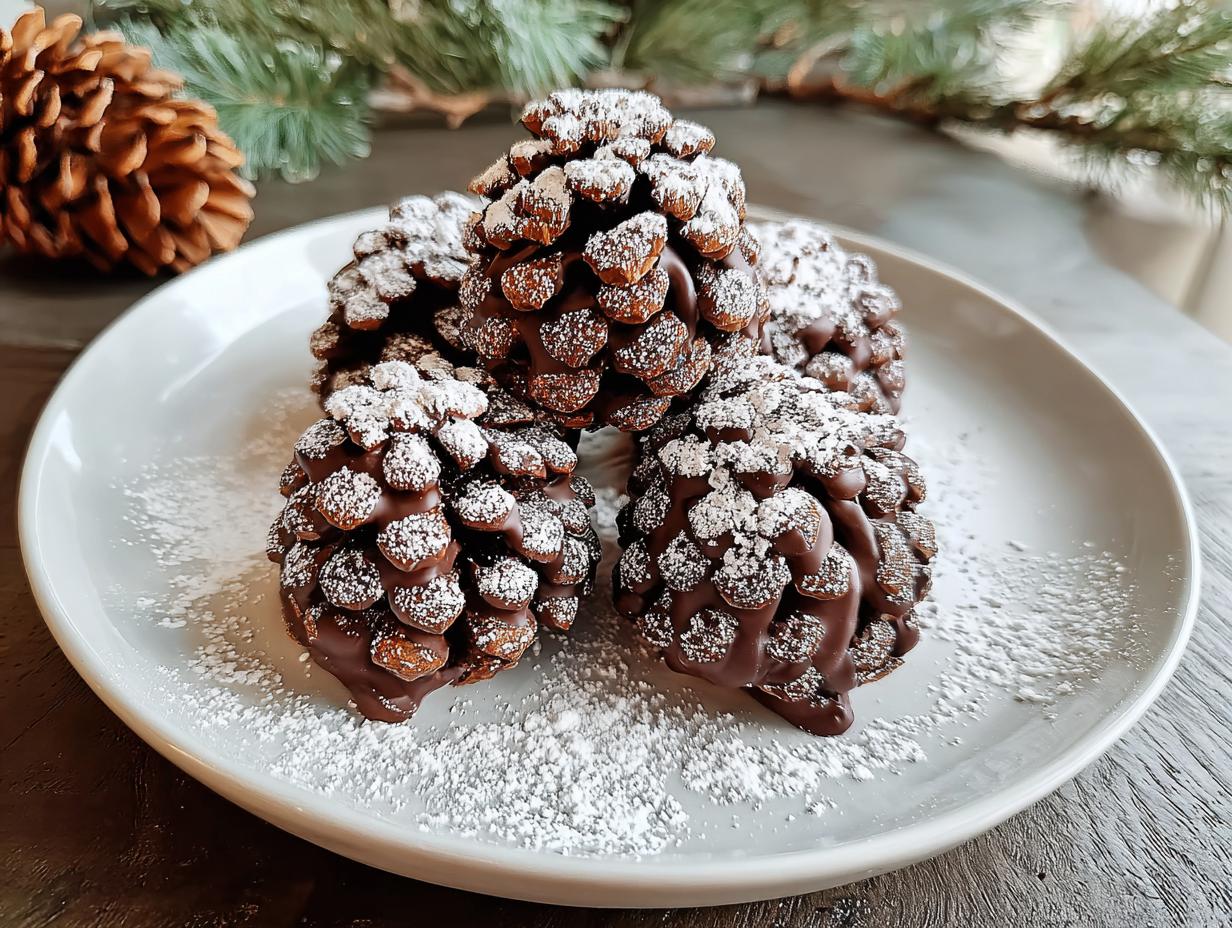
Chocolate Pine Cones have a magical way of bringing the cozy spirit of the holidays right into my kitchen. I remember the first time I saw them on a friend’s dessert table; they looked like they’d been plucked straight from a winter forest, dusted with a perfect layer of snow. The smell of chocolate and warm spices filled the air, and I just knew I had to try making them myself. These festive chocolate pine cones are surprisingly simple, making them the perfect activity for a chilly afternoon. They’re such easy chocolate pine cone treats that anyone can whip them up, and they’re guaranteed to impress your guests. Let’s get cooking!
Why You’ll Love This Chocolate Pine Cone Recipe
You’ll adore making these delightful edible chocolate pine cones for so many reasons:
- Amazing Taste: Rich chocolatey flavor with a satisfying crunch from the cornflakes.
- Super Quick Prep: Ready in just 15 minutes, perfect for last-minute holiday needs.
- Family Fun: A wonderful activity to do with kids – they’ll love shaping and decorating.
- Budget-Friendly: Uses common pantry staples, making them an economical treat.
- No-Bake Ease: No oven needed means less fuss and more time enjoying the festive spirit.
- Impressive Presentation: These edible chocolate pine cones look stunning on any holiday dessert table.
- Versatile Decor: They double as charming, edible decorations for your Christmas spread.
- Easy to Make: You’ll find this chocolate pine cone recipe incredibly straightforward to follow.
Ingredients for Edible Chocolate Pine Cones
Gathering the right ingredients is the first step to creating these charming chocolate pine cones. You’ll need a base of crushed digestive biscuits, sometimes called graham crackers, which give our edible pine cones their structure. We’ll mix this with a good amount of unsweetened cocoa powder for that deep chocolate flavor, and a touch of powdered sugar for sweetness. A little milk and softened butter bind everything together, creating a dough perfect for molding. For that authentic pine cone texture, we’ll use plenty of cornflakes. The optional desiccated coconut adds an extra layer of flavor and texture, making these chocolate coated pine cones even more delightful. Don’t forget extra powdered sugar for that magical snowy dusting!
- 1 cup digestive biscuits or graham crackers, crushed into fine powder – this forms the base of our edible pine cones.
- 3 tbsp unsweetened cocoa powder – for that rich, deep chocolate flavor.
- 2 tbsp powdered sugar – adds a touch of sweetness to the dough.
- 1/2 cup desiccated coconut (optional) – for added flavor and texture in our chocolate pine cone sweets.
- 2 tbsp milk (adjust as needed) – helps bind the ingredients into a moldable dough.
- 3 tbsp softened butter or margarine – essential for a smooth, pliable dough.
- 1/2 tsp vanilla extract – enhances the overall chocolate flavor.
- Cornflakes or cereal flakes, as needed – these are crucial for creating the pine cone scale texture.
- Powdered sugar, for dusting – gives that beautiful, festive snowy finish.
How to Make Chocolate Pine Cones
Crafting these adorable DIY chocolate pine cones is a delightful holiday activity that’s surprisingly simple. We’ll start by creating a rich chocolate dough that’s easy to shape, then painstakingly add cornflakes to mimic the natural texture of pine cones. The final touch of powdered sugar dusting really brings them to life, making them look like little winter wonders. Get ready to impress everyone with these sweet, edible decorations!
- Step 1: Prepare the Chocolate DoughIn a medium bowl, combine the finely crushed digestive biscuits (or graham crackers), unsweetened cocoa powder, powdered sugar, and optional desiccated coconut. Give it a quick stir to mix these dry ingredients. Next, add the softened butter, vanilla extract, and milk. Start mixing with a spoon or spatula, then switch to your hands as the mixture comes together. You want to achieve a soft, moldable dough that holds its shape without being too sticky or too dry. If it feels a bit crumbly, add a tiny bit more milk; if it’s too sticky, a sprinkle more crushed biscuits or powdered sugar will do the trick. This dough is the foundation for all our DIY chocolate pine cones.
- Step 2: Shape Your Pine Cone CoresNow, it’s time to form the basic shape of our pine cones. Take about a quarter of the dough at a time and roll it between your palms to create an oval or cone shape. Think of a plump teardrop or a small carrot – this will be the core of your pine cone. Aim for a size that feels substantial but not too large; they should be easy to handle and look proportionate. Gently pinch the top to create a slight point. Making these cores is a key part of creating realistic pine cone shaped chocolates.

- Step 3: Add the Pine Cone ScalesThis is where the magic happens! Gently press the cornflakes into the dough, starting from the wider base of your cone and working your way up towards the tip. Insert each flake at a slight angle, overlapping them just like real pine cone scales. You’ll want to press them in firmly enough so they stick, but not so hard that you distort the cone shape. Continue layering the cornflakes, ensuring they are closely packed, until the entire surface of the dough core is covered. This step is crucial for achieving that authentic texture in your DIY chocolate pine cones.
- Step 4: Chill and SetOnce your cornflakes are perfectly in place, carefully transfer the shaped pine cones to a baking sheet lined with parchment paper. It’s really important to let them firm up before the final dusting. Place the baking sheet in the refrigerator for about 15 to 20 minutes. This chilling period allows the butter in the dough to re-solidify, helping the pine cones maintain their shape and making them easier to handle for the final decorating step. Don’t rush this part; a well-chilled cone will hold its form beautifully.

- Step 5: The Finishing TouchFor that truly enchanting, snowy winter look, we’ll give our chocolate pine cones a dusting of powdered sugar. Place some powdered sugar in a fine-mesh sieve. Gently tap the sieve over the chilled pine cones, allowing a light, even coating to fall onto the cornflake “scales.” You want to create the illusion of freshly fallen snow. Be careful not to over-do it; a light dusting is all it takes to transform them into beautiful holiday decorations. These festive treats are now ready to be admired and enjoyed!
Pro Tips for the Best DIY Chocolate Pine Cones
To ensure your chocolate pine cones turn out perfectly every time, here are a few tricks I’ve learned. Following this chocolate pine cone tutorial can elevate your creations from good to absolutely spectacular!
- Dough Consistency is Key: If your dough is too sticky, don’t panic! A little extra finely crushed biscuit or powdered sugar will fix it right up. Conversely, if it’s too dry and crumbly, a teaspoon of milk or melted butter can bring it back together.
- Cornflake Placement Matters: For the most realistic look, layer your cornflakes thoughtfully. Start at the base and overlap each flake as you move upwards. Press them in gently but firmly to ensure they stick well, creating those beautiful, textured scales.
- Chill Thoroughly: Don’t rush the chilling step! Refrigerating the shaped cones for at least 15-20 minutes is crucial. It helps the butter solidify, firming up the dough so your pine cones hold their shape beautifully when you add the final dusting.
What’s the secret to perfect Chocolate Pine Cones?
The secret lies in the dough’s consistency – it needs to be pliable enough to mold but firm enough to hold shape. Also, layering the cornflakes carefully creates those authentic-looking scales, making them truly convincing pine cone shaped chocolates.
Can I make Chocolate Pine Cones ahead of time?
Yes, you absolutely can! You can prepare the dough and even shape the cones a day in advance. Store them in an airtight container in the refrigerator. Just add the cornflakes and the final powdered sugar dusting right before serving for the freshest look and taste.
How do I avoid common mistakes with Chocolate Pine Cone Dessert?
A common mistake is making the dough too wet, which makes shaping difficult. Another pitfall is not chilling the cones long enough, causing them to lose their shape. Lastly, don’t overload the dusting of powdered sugar; a light, snowy effect is more elegant. Learning how to make edible pine cones with chocolate involves paying attention to these details.
Best Ways to Serve Holiday Chocolate Pine Cones
These charming chocolate dessert resembling pine cones are incredibly versatile and add a touch of winter magic to any holiday spread. They’re perfect as a standalone treat, perhaps arranged artfully on a platter to mimic a mini forest. For a more elaborate dessert table, consider serving them alongside a rich chocolate Yule log or a creamy vanilla panna cotta, allowing their unique texture to contrast beautifully. They also make a delightful accompaniment to a warm mug of mulled cider or hot chocolate, completing that cozy, festive feeling. These sweet treats are a wonderful way to add a handcrafted, visual element to your Christmas celebrations. You can find more last recipes here.
Nutrition Facts for Chocolate Pine Cones
Here’s a breakdown of the estimated nutritional information for each delicious chocolate pine cone treat. These values help you understand what goes into these festive sweets.
- Serving Size: 1 pine cone
- Calories: 180
- Fat: 8g
- Saturated Fat: 5g
- Protein: 2g
- Carbohydrates: 25g
- Fiber: 2g
- Sugar: 15g
- Sodium: 75mg
Nutritional values are estimates and may vary based on specific ingredients used. For more information on healthy eating, consider these 3 foods you should eat less of to stay healthy.
How to Store and Reheat Chocolate Pine Cones
Properly storing these delightful chocolate pine cone sweets ensures they stay fresh and maintain their charming appearance. Once your chocolate pine cones have completely cooled after shaping and chilling, it’s time to think about storage. For short-term enjoyment, place them in an airtight container at room temperature for up to 2 days, especially if you haven’t added the final powdered sugar dusting yet. If you need to keep them longer than that, or if your kitchen is warm, it’s best to store them in the refrigerator. They’ll stay good there for about 3 to 4 days. For longer preservation, these easy chocolate pine cone treats freeze beautifully. Wrap each cone individually in plastic wrap, then place them in a freezer-safe bag or container. They can be kept frozen for up to 3 months. When you’re ready to enjoy them, simply let them thaw in the refrigerator overnight. If they lose their snowy look, you can always give them a fresh dusting of powdered sugar before serving! You might also find our guide on copycat recipes helpful for other treats.
Frequently Asked Questions About Chocolate Pine Cone Sweets
Got questions about whipping up these adorable chocolate pine cones? I’ve got you covered with answers to some common queries!
What’s the secret to perfect Chocolate Pine Cones?
The secret lies in the dough’s consistency – it needs to be pliable enough to mold but firm enough to hold shape. Also, layering the cornflakes carefully creates those authentic-looking scales, making them truly convincing pine cone shaped chocolates.
Can I make Chocolate Pine Cones ahead of time?
Yes, you absolutely can! You can prepare the dough and even shape the cones a day in advance. Store them in an airtight container in the refrigerator. Just add the cornflakes and the final powdered sugar dusting right before serving for the freshest look and taste.
How do I avoid common mistakes with Chocolate Pine Cone Dessert?
A common mistake is making the dough too wet, which makes shaping difficult. Another pitfall is not chilling the cones long enough, causing them to lose their shape. Lastly, don’t overload the dusting of powdered sugar; a light, snowy effect is more elegant. Learning how to make edible pine cones with chocolate involves paying attention to these details.
Can I use different cereals for my chocolate pine cones?
Absolutely! While cornflakes are classic for their scale-like shape, you could experiment with other crispy cereals like bran flakes, puffed rice, or even crushed pretzels for a unique texture and flavor twist on these festive chocolate pine cones.
Variations of Chocolate Pine Cones You Can Try
These delightful chocolate pine cones are wonderfully adaptable, allowing you to get creative with your holiday treats. Beyond the classic recipe, here are a few fun variations to make your creations even more special and perfectly suited for your festive needs!
- Gluten-Free Festive Chocolate Pine Cones: Simply swap the digestive biscuits for your favorite gluten-free cookies or gluten-free graham crackers. Ensure your cocoa powder and any optional additions are also certified gluten-free for a safe and delicious treat.
- White Chocolate Pine Cones: For a different flavor profile, use white chocolate chips melted with a little coconut oil as a binder instead of butter and milk. You can even dust these with green edible glitter or finely chopped pistachios for a unique look.
- Spiced Chocolate Pine Cones: Add a pinch of cinnamon, nutmeg, or even a touch of cayenne pepper to the dry ingredients for a warm, spiced kick. This is especially lovely for festive chocolate pine cones intended for a cozy winter gathering.
- Dark Chocolate Pine Cone Delight: If you prefer a richer, less sweet flavor, use dark cocoa powder and consider adding a tablespoon of strong brewed coffee to the dough. This deepens the chocolate flavor beautifully.

Chocolate Pine Cones: 5 Easy Steps
- Total Time: 20 minutes
- Yield: 4–5 pine cones 1x
- Diet: Vegetarian
Description
These Chocolate Pine Cones are festive, no-bake treats made with a chocolate-biscuit base and layered cornflakes to resemble pine cones. Dusted with powdered sugar for a snowy effect, they’re cozy, edible Christmas decor that’s perfect for parties, gifting, or holiday dessert tables. Easy, fun, and irresistible!
Ingredients
- 100g (1 cup) digestive biscuits or graham crackers, crushed into fine powder
- 3 tbsp unsweetened cocoa powder
- 2 tbsp powdered sugar
- 1/2 cup desiccated coconut (optional)
- 2 tbsp milk (adjust as needed)
- 3 tbsp softened butter or margarine
- 1/2 tsp vanilla extract
- Cornflakes or cereal flakes, as needed
- Powdered sugar, for dusting
Instructions
- Prepare dough: Mix crushed biscuits, cocoa, powdered sugar, and coconut in a bowl. Add butter, vanilla, and milk gradually until a soft, moldable dough forms.
- Shape cones: Divide dough and roll into oval/cone shapes to form the pine cone cores.
- Add flakes: Insert cornflakes at an angle starting from the base, layering upward to resemble pine cone scales.
- Chill: Place cones on a tray and refrigerate 15–20 minutes to firm.
- Finish: Dust with powdered sugar for a snowy look and serve.
Notes
- If dough is too sticky, add more crushed biscuits.
- Press cornflakes gently so they adhere to the dough.
- Chilling is essential to hold shape—don’t skip this step.
- Best served fresh; add cereal and sugar dusting just before serving.
- Prep Time: 15 minutes
- Cook Time: No-bake
- Category: Dessert
- Method: No-bake
- Cuisine: Christmas
Nutrition
- Serving Size: 1 pine cone
Keywords: Chocolate Pine Cones, chocolate pine cone recipe, edible chocolate pine cones, how to make chocolate pine cones, DIY chocolate pine cones, chocolate pine cone dessert, festive chocolate pine cones, holiday chocolate pine cones, Christmas chocolate pine cones, easy chocolate pine cone treats, chocolate coated pine cones, pine cone shaped chocolates, chocolate dessert resembling pine cones, make edible pine cones with chocolate, chocolate pine cone decorations, chocolate pine cone crafting, sweet chocolate pine cone ideas, chocolate pine cone baking, chocolate pine cone sweets, chocolate pine cone gifts, chocolate pine cone tutorial