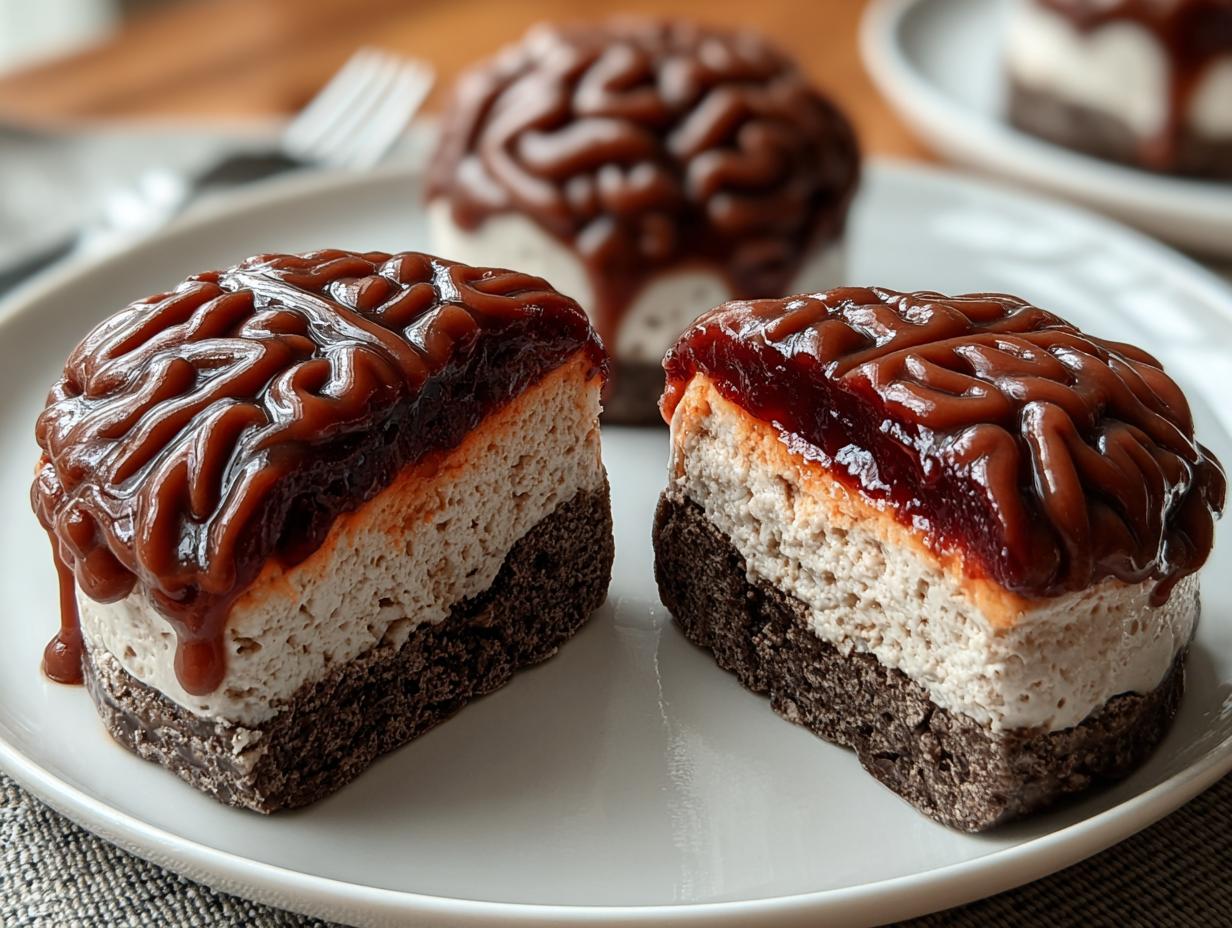
Fudge Halloween dreams come true with this delightfully gruesome brain-shaped chocolate peanut butter fudge! Imagine the ooohs and aaahs as your guests bite into this creepy creation, revealing a gooey raspberry “blood” filling that oozes out. The rich, creamy chocolate peanut butter fudge base is incredibly satisfying, making it a standout among your homemade Halloween fudge for parties. It looks terrifyingly complex, but I promise it’s surprisingly easy to whip up. Let’s get cooking and make these frightful delights!
Why You’ll Love This Fudge Halloween Recipe
This recipe is a winner for so many reasons:
- Unique Spooky Design: Forget boring squares! These brain-shaped treats are a guaranteed conversation starter.
- Delicious Flavor: The classic combination of rich chocolate and creamy peanut butter is simply irresistible.
- Easy No-Bake Method: You don’t need to be a master baker to create this impressive dessert – it’s truly an easy Halloween fudge.
- Perfect for Parties: Serve this as the star of your Halloween bash or as part of a larger homemade Halloween fudge assortment.
- Kid-Friendly Fun: Kids will love helping to make (and eat!) these spooky delights.
- Customizable: Feel free to swap the raspberry jam for strawberry or cherry, or add a few drops of food coloring to the fudge base for a different look.
Ingredients for Your Creepy Halloween Fudge
Here’s everything you need to create these deliciously gory Halloween fudge brains!
- 1 (14-ounce) can sweetened condensed milk – This gives our fudge that wonderfully smooth and rich texture.
- 3 cups semi-sweet chocolate chips – The base for our decadent chocolate peanut butter fudge.
- 1/2 cup creamy peanut butter – Adds that classic, irresistible nutty flavor that pairs so well with chocolate.
- 1/4 cup unsalted butter – For extra silkiness and to help everything melt together beautifully.
- 1/4 teaspoon salt – A little salt enhances all the sweet flavors.
- 1 teaspoon vanilla extract – Adds a warm, comforting aroma and taste.
- 1/3 cup seedless raspberry jam – This is our “blood” filling, so seedless is key for a smooth, spooky effect.
- Optional: red food coloring – If you want an extra vibrant “bloody” look for your fudge.
- Optional: brain-shaped silicone mold – For the ultimate creepy presentation, though mini muffin tins work too!

How to Make This Spooky Halloween Fudge
Let’s get down to making these delightfully creepy Halloween fudge brains! It’s a straightforward process, making it one of my favorite easy Halloween fudge recipes.
- Step 1: Start by preparing your mold. If you’re using a brain-shaped silicone mold, give it a very light grease. If you’re opting for a mini muffin tin, line it with paper liners or grease it well. Place your prepared mold on a tray that can fit into your freezer; this makes handling much easier.
- Step 2: In a medium saucepan over low heat, combine the sweetened condensed milk, semi-sweet chocolate chips, creamy peanut butter, and unsalted butter. Stir constantly. You want everything to melt together into a smooth, glossy mixture without scorching the chocolate. This is the foundation of our delicious chocolate peanut butter fudge.
- Step 3: Once the mixture is completely smooth and luscious, remove the saucepan from the heat. Stir in the salt and vanilla extract. This step really wakes up all those wonderful flavors and enhances the overall taste of your homemade Halloween fudge.
- Step 4: Now it’s time to fill your molds! Carefully spoon the warm fudge mixture into each cavity of your prepared brain mold or mini muffin tin. Fill them about halfway, making sure to press the fudge up the sides slightly to create a little well for our “blood.”
- Step 5: Spoon about a teaspoon of the seedless raspberry jam into the center of each fudge-filled cavity. This is where the magic happens! If you want an even more vivid “blood” effect, stir a drop or two of red food coloring into the jam before adding it.
- Step 6: Gently spoon more fudge mixture over the jam layer, completely covering it. Smooth the tops of the fudge with the back of your spoon or a small offset spatula. Try to get them as flat as possible for a cleaner look once unmolded.
- Step 7: Carefully transfer the tray with the filled molds into the freezer. Let them chill for at least 2–3 hours, or until the fudge is completely firm to the touch. This chilling time is crucial for successful unmolding and achieving the perfect texture for these Halloween fudge recipes.
- Step 8: Once firm, gently remove the fudge brains from their molds. You can serve them chilled for a firmer texture or let them sit at room temperature for about 15-20 minutes to achieve that full, gooey “bleeding” effect. Enjoy your spooky creation!

Creative Halloween Fudge Decorations & Variations
Want to take your spooky fudge to the next level? Here are some fun ideas for Halloween fudge decorations and variations that will impress everyone!
- Extra Gore: Drizzle some edible blood gel or extra raspberry jam over the top after unmolding for an even more gruesome “bleeding” effect.
- Creepy Eyes: Stick a couple of candy eyes onto the fudge brains before they are fully set or just after unmolding.
- White Chocolate Drizzle: Melt some white chocolate and drizzle it over the brains for a cracked, aged look, or to create cobwebs.
- Flavor Swaps: Don’t have raspberry jam? Strawberry or cherry jam works beautifully. You could even experiment with different nut butters in the fudge base, like almond butter, for a new flavor profile.
- Colored Fudge: Add a few drops of green, purple, or orange food coloring to the main fudge mixture before pouring it into the molds for a truly unique Halloween look.
What’s the secret to perfect Halloween fudge brains?
The key to the best Halloween fudge brains is definitely the mold! Using a brain-shaped silicone mold gives you that iconic look. Also, make sure your fudge is fully chilled and firm before unmolding to keep those intricate details intact. Using seedless jam is also crucial for a smooth, realistic “blood” effect. For more tips on creating perfect desserts, check out these copycat recipes.
Can I make this Halloween fudge ahead of time?
Absolutely! This fudge is a fantastic make-ahead treat. You can prepare it 2–3 days in advance and store it in an airtight container in the refrigerator. Serving it slightly chilled actually enhances the gooey “bleeding” effect when you bite into it, adding to the spooky fun.
How do I avoid common mistakes with Halloween fudge?
To ensure success with your how to make Halloween fudge project, avoid these common pitfalls: If your fudge isn’t firming up, make sure it chilled for the full recommended time. For easier unmolding, grease your molds lightly. If your jam leaks out, you might have overfilled that layer – aim for just enough to fill the center. If you’re looking for other easy dessert ideas, consider these easy no-bake desserts.
Best Ways to Serve Your Fudge Halloween Treats
Once your spooky brain fudge is ready, it’s time to show them off! These Halloween fudge treats are perfect for a variety of occasions. For a Halloween party, arrange them on a tiered platter alongside other festive desserts. Their unique shape makes them a fantastic centerpiece! You can also serve them individually as charmingly creepy party favors, wrapped in cellophane with a festive ribbon. They’re wonderful as part of a larger Halloween fudge assortment, complementing spooky cookies or Halloween-themed cupcakes. Don’t forget to pair them with a spooky punch or a warm, spiced cider for the ultimate Halloween experience!
Nutrition Facts for Halloween Fudge Brains
Here’s a look at the estimated nutritional breakdown for these creepy crawly treats. Remember, these are just guidelines, as your specific ingredients might vary slightly.
- Serving Size: 1 fudge brain
- Calories: 250
- Fat: 14g
- Saturated Fat: 8g
- Carbohydrates: 28g
- Sugar: 25g
- Protein: 3g
- Sodium: 50mg
Nutritional values are estimates and will vary based on specific ingredients used. For more information on healthy eating, you might find this article on foods to eat less of helpful.
How to Store and Reheat Fudge Halloween
Proper storage is key to keeping your spooky Halloween fudge treats fresh and delicious. After your fudge brains have firmed up and you’ve removed them from the molds, let them cool completely at room temperature if they aren’t already. Then, it’s time for some smart Halloween candy fudge storage.
For enjoying within a week, place the fudge brains in a single layer in an airtight container. You can add parchment paper between layers if stacking. Store the container in the refrigerator. This helps maintain their shape and keeps them perfectly chilled for serving. If you need to store them for longer, up to 3 months, your freezer is your best friend. Wrap them well in plastic wrap, then place them in a freezer-safe airtight container. When you’re ready to enjoy them, simply transfer them to the refrigerator to thaw overnight. These treats are typically served chilled or at room temperature, so reheating isn’t usually necessary, but if you prefer them slightly warmer, a few seconds in the microwave might work, though it could affect the texture.
Frequently Asked Questions About Fudge Halloween
Can I use a different type of chocolate for this Halloween fudge?
Yes, you absolutely can! While semi-sweet chocolate chips are called for in this recipe for that classic chocolate peanut butter fudge taste, you can certainly experiment. Using milk chocolate chips will result in a sweeter fudge, while dark chocolate chips will give it a more intense, less sweet flavor. Just be aware that different chocolate types might affect the final sweetness and color of your homemade Halloween fudge.
What if I don’t have a brain mold for this spooky fudge?
Don’t worry if you don’t have a specific brain-shaped silicone mold! You can easily adapt this recipe. Using a mini muffin tin lined with paper liners is a great alternative for making individual treats. Alternatively, you can pour the entire fudge mixture into a greased 8×8 inch baking pan, let it chill until firm, and then cut it into squares. You’ll still get all the delicious flavor of this fun what is Halloween fudge treat! For more ideas on making delicious treats, explore these easy chocolate chip cookie recipes.
Is this Halloween fudge suitable for nut allergies?
Unfortunately, this particular recipe is not suitable for individuals with nut allergies. It prominently features peanut butter as a key ingredient, which is essential for the flavor and texture of this chocolate peanut butter fudge. If you need to make a nut-free version, you’ll want to look for a completely different homemade Halloween fudge recipe that specifically avoids nuts and uses nut-free substitutes.
Fun Halloween Fudge Variations to Try
Ready to get even more creative with your spooky sweets? These Halloween fudge recipes offer a fun twist on the classic brain fudge. They’re perfect for exploring different spooky fudge ideas and making your Halloween treats truly unique!
- Multi-Colored “Blood”: Instead of just raspberry, try using different colored jams! Think cherry for a darker, richer blood, or even a bright red strawberry jam. You could even mix a tiny bit of green or purple food coloring into separate small portions of jam for a truly gruesome, otherworldly effect.
- Sprinkle Surprise: For added texture and visual appeal, gently fold a handful of festive Halloween sprinkles (like pumpkins, ghosts, or black and orange jimmies) into the fudge mixture right before pouring it into the molds. This gives your fudge an unexpected pop of color and crunch.
- Monster Mash Fudge: Embed candy eyes into the fudge while it’s still slightly soft in the mold. You can place one or two on top of each brain for a wonderfully creepy, wide-eyed look. For an extra touch, drizzle some melted white chocolate over the eyes for a “webbed” effect.
- Ghostly Goodness: If you don’t have a brain mold, try using a ghost-shaped silicone mold! You can adapt the jam filling by making it a lighter color, or even omitting it and just decorating the ghost fudge with black edible marker details for eyes and a mouth.
Fudge Halloween Brains: Gruesome & Gooey Treats
- Total Time: 2 hours 30 minutes
- Yield: 12 fudge brains 1x
- Diet: Vegetarian
Description
This Halloween fudge recipe creates creepy, brain-shaped chocolate peanut butter fudge with a gooey raspberry ‘blood’ filling. It’s a delightfully gross and delicious treat perfect for spooky celebrations.
Ingredients
- 1 (14-ounce) can sweetened condensed milk
- 3 cups semi-sweet chocolate chips
- 1/2 cup creamy peanut butter
- 1/4 cup unsalted butter
- 1/4 teaspoon salt
- 1 teaspoon vanilla extract
- 1/3 cup raspberry or strawberry jam (seedless)
- Optional: red food coloring
- Optional: brain-shaped silicone mold
Instructions
- Lightly grease your brain mold or mini muffin tin and place on a freezer-safe tray.
- In a saucepan, combine chocolate chips, peanut butter, condensed milk, and butter. Heat on low, stirring until smooth.
- Remove from heat, stir in salt and vanilla.
- Spoon fudge into each mold cavity, filling halfway and pressing up the sides.
- Place 1 teaspoon raspberry jam in the center of each cavity. Add red food coloring if desired.
- Top with more fudge to cover completely. Smooth the tops.
- Place in freezer for 2–3 hours until firm.
- Remove from molds and serve chilled or at room temperature for the full bleeding effect.
Notes
- Use seedless jam for the smoothest, blood-like effect.
- Work quickly as fudge thickens as it cools.
- Grease molds lightly for easier release.
- Freeze thoroughly before unmolding for best results.
- For extra gore, drizzle red gel icing or extra jam over the top.
- Prep Time: 15 minutes
- Cook Time: 5 minutes
- Category: Dessert
- Method: No-Bake / Freezer
- Cuisine: Halloween Treats
Nutrition
- Serving Size: 1 fudge brain
Keywords: Halloween fudge, spooky fudge, chocolate peanut butter fudge, gory fudge, brain fudge, raspberry blood fudge, easy Halloween fudge, homemade Halloween fudge, Halloween candy fudge, festive Halloween fudge