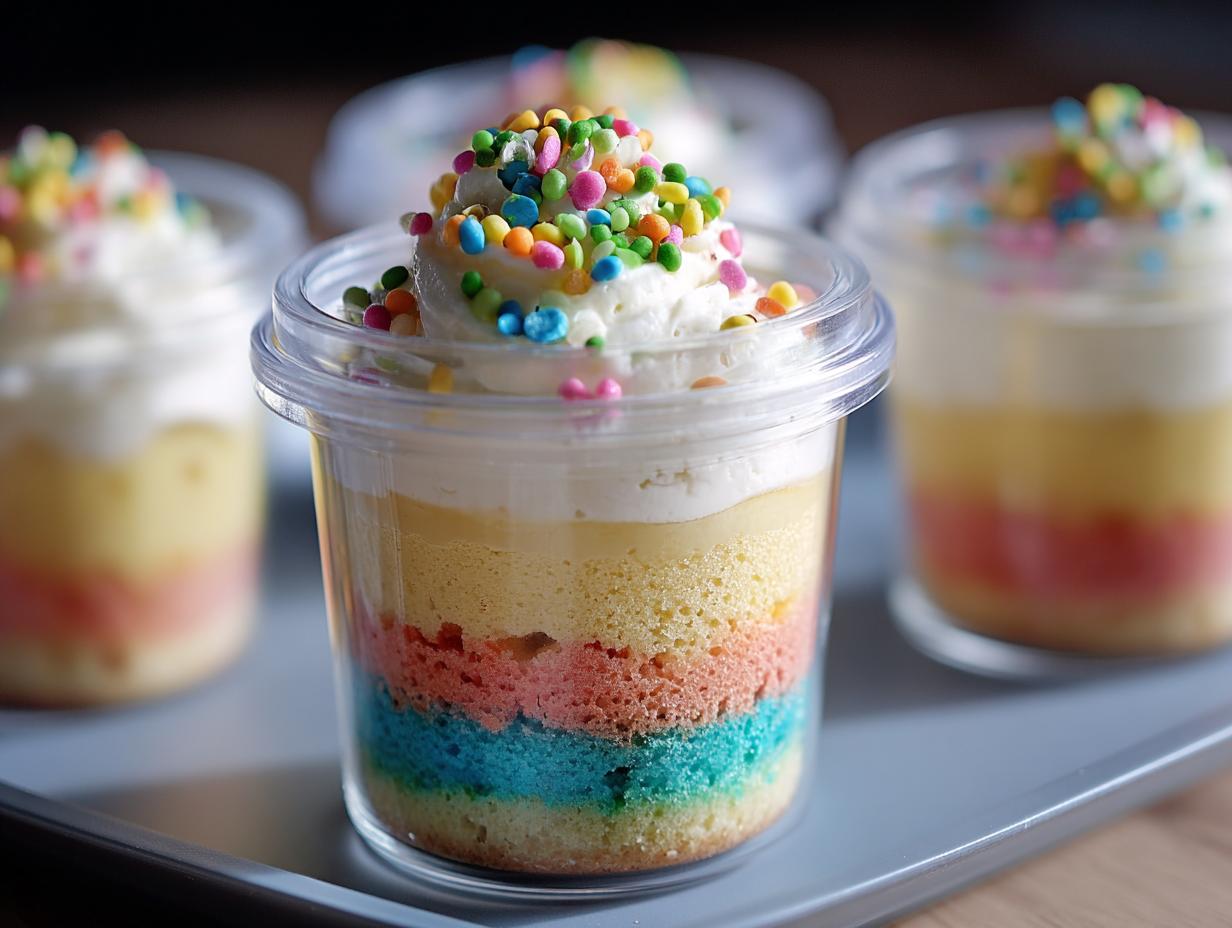
Cake cups have a special place in my heart, reminding me of childhood birthday parties where every guest got their own perfect little dessert. There’s just something magical about a personal-sized treat, isn’t there? I remember my mom making these for my sister’s birthday – the colorful layers of fluffy cake and creamy frosting peeking out of little jars were so enchanting. It felt like a truly special occasion, even if it was just a simple cupcake. These cute mini cakes for parties are incredibly versatile and bring such joy, whether you’re celebrating a big event or just need a sweet pick-me-up. Let’s get cooking!
Why You’ll Love These Cake Cups
- An absolute delight for your taste buds – the fluffy cake and creamy frosting are a match made in heaven!
- Incredibly quick to prepare, with a total time of just 50 minutes plus chilling, perfect for busy schedules.
- They offer a satisfying treat without being overly heavy, making them a great choice for a lighter dessert option.
- Super budget-friendly, as they start with a simple cake mix and common pantry staples.
- A huge hit with the whole family, from toddlers to grandparents, making them ideal for get-togethers.
- Each individual cake is perfectly portioned, meaning no more cutting or messy serving.
- These individual cakes are also wonderfully adaptable for any occasion or dietary need with a few simple swaps.
Ingredients for Cake Cups
Gathering these simple ingredients is the first step to creating these delightful cake cups. They’re perfect for anyone looking for mini cake recipes that are both easy and impressive. We’ll start with a classic white cake mix, which is a fantastic base for customization.
- 1 box white cake mix (15.25 oz) – the foundation for our fluffy cake
- 1 cup water – essential for activating the cake mix
- 1/2 cup vegetable oil – keeps the cake wonderfully moist
- 3 large eggs – helps bind everything together for a tender crumb
- 1/4 cup rainbow sprinkles (optional) – for that extra pop of fun inside the cake
- 1 cup unsalted butter, softened – the base for our creamy frosting
- 4 cups powdered sugar – to sweeten and thicken the frosting
- 1 – 2 tablespoons milk or heavy cream – to achieve the perfect frosting consistency
- Extra rainbow sprinkles (optional toppings) – for decorating the finished dessert cups
- Mini candies or cookies (optional toppings) – add texture and visual appeal
- Colorful whipped cream (optional toppings) – a light and airy topping option
How to Make Cake Cups
Follow these simple steps to create your own adorable cake cups. This recipe makes it easy to learn how to make cake cups that are perfect for any celebration!
- Step 1: Preheat your oven to 350°F (175°C). Make sure your oven rack is in the center position. Prepare a 9×13-inch baking pan by greasing it well or lining it with parchment paper.
- Step 2: In a large mixing bowl, combine the contents of the white cake mix box with 1 cup of water, 1/2 cup of vegetable oil, and 3 large eggs. Beat everything together with an electric mixer on medium speed for about 2 minutes, or until the batter is smooth and well combined. If you’re adding sprinkles to the cake batter itself, gently fold them in now.
- Step 3: Pour the cake batter evenly into the prepared 9×13-inch pan. Place the pan in the preheated oven and bake for 25–30 minutes. You’ll know it’s done when a toothpick inserted into the center comes out clean, and the cake springs back lightly when touched.
- Step 4: Once baked, carefully remove the cake from the oven and let it cool in the pan for about 10 minutes before inverting it onto a wire rack to cool completely. This step is crucial for assembling your cake cups later.
- Step 5: While the cake cools, let’s make the frosting. In a separate bowl, beat 1 cup of softened unsalted butter until it’s smooth and creamy. Gradually add 4 cups of powdered sugar, mixing on low speed until incorporated, then increase the speed and beat until light and fluffy. Add 1–2 tablespoons of milk or heavy cream, a little at a time, until you reach a spreadable consistency. Stir in the vanilla extract.
- Step 6: Once the cake is completely cool, cut it into cubes or use a round cookie cutter to create perfect layers for your cake cups. Layer the cake pieces and frosting in your chosen jars or cups, alternating between the two. Repeat the layers until the cups are full. This is where learning how to make cake cups really becomes fun!
- Step 7: Finish by topping the last layer of frosting with extra rainbow sprinkles, mini candies, cookies, or colorful whipped cream. You’ve mastered how to make cake cups!

Pro Tips for the Best Cake Cups
Want to elevate your cake cups from good to absolutely amazing? I’ve picked up a few tricks over the years that really make a difference!
- Make sure your cake layers are completely cool before you start assembling. Warm cake will melt the frosting, creating a messy, unappealing layer.
- For super neat layers, use a piping bag with a round tip for both the cake and frosting. It looks so professional!
- Clear jars or glasses are your best friend here. They really showcase the beautiful layers and make your cake cups look extra special.
- Don’t be afraid to get creative with your toppings! Crushed cookies, fresh berries, or a drizzle of chocolate ganache can transform a simple cake cup.
What’s the secret to perfect cake cups?
The secret is in the texture! Using a good quality cake mix ensures a fluffy base, and the creamy, buttery frosting is key. For a truly personalized cake experience, focus on smooth layers and attractive toppings.
Can I make cake cups ahead of time?
Yes, you absolutely can! You can bake the cake layers and make the frosting a day in advance. Store the cooled cake in an airtight container at room temperature and the frosting in the fridge. Assemble them a few hours before serving for the best texture.
How do I avoid common mistakes with cake cups?
The biggest mistake is assembling while the cake is still warm, which melts the frosting. Also, resist overfilling the cups; leave a little space at the top for frosting and toppings. Finally, ensure your butter is properly softened for the frosting – not melted!
Best Ways to Serve Cake Cups
These versatile cake cups are perfect for almost any occasion! For a delightful dessert spread, consider serving them alongside fresh berries or a scoop of vanilla bean ice cream. They also make fantastic party dessert cups at birthdays or baby showers, offering a convenient and charming treat for guests. For a more substantial gathering, you could pair them with a light fruit salad or a refreshing lemonade for a complete sweet experience. You can find more last recipes here.
Nutrition Facts for Cake Cups
Knowing the nutritional breakdown can help you enjoy these delightful cake cups guilt-free. Each serving is a perfectly portioned treat designed for enjoyment.
- Serving Size: 1 dessert cup
- Calories: 350
- Fat: 18g
- Saturated Fat: 10g
- Protein: 3g
- Carbohydrates: 45g
- Fiber: 1g
- Sugar: 32g
- Sodium: 200mg
Nutritional values are estimates and may vary based on specific ingredients used and portion sizes. For more information on healthy eating, consider these 3 foods you should eat less of to stay healthy.
How to Store and Reheat Cake Cups
Proper storage is key to keeping your delightful cake cups fresh and delicious. Once they’ve completely cooled, transfer them into airtight containers. You can store them in the refrigerator for up to 3–4 days. This is perfect for making ahead of time, ensuring you always have a lovely single-serving cake ready to enjoy. If you need to store them for longer, you can freeze them for up to 3 months! For reheating, simply let them thaw in the refrigerator overnight. If you want a slightly warmer treat, you can microwave them for about 10–15 seconds, but be careful not to overheat them, as this can make the cake dry.

Frequently Asked Questions About Cake Cups
Can I use a different cake flavor for these cake cups?
Absolutely! While this recipe uses a white cake mix for a bright base, you can easily swap it for chocolate, yellow, or even red velvet cake mix. The layering method works beautifully with any flavor, making it simple to create your own unique easy individual dessert cups. For more ideas on flavor variations, check out these honey lime chicken variations.
What are the best containers to use for cake cups?
Clear glass jars or sturdy plastic cups work best because they allow you to see the beautiful layers you’ve created. Mason jars are a popular choice, but small plastic parfait cups or even clean, empty yogurt containers can also work wonderfully. The key is that they are food-safe and allow for easy layering.
How do I make sure the layers look neat?
For the neatest layers, I highly recommend using a piping bag with a round tip. You can pipe the cake pieces and frosting into the cups in a controlled manner. If you don’t have a piping bag, a sturdy zip-top bag with the corner snipped off can work in a pinch. Just be gentle and take your time!
Can I make these cake cups for a large event?
Yes, these are perfect for large events! You can bake the cake and make the frosting a day or two in advance and store them separately. Then, on the day of your event, you can assemble them quickly. They are a crowd-pleaser and make for beautiful easy individual dessert cups that guests will rave about. You might also like these 15 quick delicious dishes.
Variations of Cake Cups You Can Try
One of the best things about these cake cups is how adaptable they are! You can easily switch up the flavors and even some of the methods to create completely new treats. I love experimenting with different combinations, and you will too.
- Chocolate Lover’s Dream: Swap the white cake mix for a rich chocolate cake mix. Pair it with a creamy chocolate ganache or a mint-flavored frosting for a decadent treat. These chocolate mini cakes are always a hit!
- Red Velvet Delight: Use a red velvet cake mix and a classic cream cheese frosting. The vibrant color and tangy frosting are a match made in heaven.
- Lemon Blueberry Burst: Opt for a lemon cake mix and swirl in some fresh blueberries before baking. Top with a light lemon buttercream or a dollop of whipped cream for a refreshing flavor.
- Gluten-Free Option: You can easily make these cake cups gluten-free by using your favorite gluten-free white or yellow cake mix. Just follow the package directions for liquid and fat adjustments.

Cake Cups: 50 Min Magic Desserts
- Total Time: 50 minutes + chilling
- Yield: 10–12 dessert cups 1x
- Diet: Vegetarian
Description
This simple cake in a cup recipe is festive, adorable, and easy to make. Perfect for birthdays, baby showers, bake sales, or weekday treats, these colorful dessert shooters are fun to prepare and versatile for any occasion. Layer fluffy cake with creamy frosting in mason jars or cups for a sweet presentation guests will love.
Ingredients
- 1 box white cake mix (15.25 oz)
- 1 cup water
- 1/2 cup vegetable oil
- 3 large eggs
- 1/4 cup rainbow sprinkles (optional)
- 1 cup unsalted butter, softened
- 4 cups powdered sugar
- 1 tablespoon vanilla extract
- 1 – 2 tablespoons milk or heavy cream
- Extra rainbow sprinkles (optional toppings)
- Mini candies or cookies (optional toppings)
- Colorful whipped cream (optional toppings)
Instructions
- Preheat oven to 350°F (175°C). In a large bowl, combine cake mix, water, oil, and eggs. Beat for 2 minutes until smooth. Fold in sprinkles if using.
- Pour batter into a greased 9×13-inch pan. Bake 25–30 minutes or until a toothpick comes out clean. Cool completely on a wire rack.
- Beat butter until smooth. Gradually add powdered sugar, mixing well. Add vanilla and just enough milk to reach spreadable consistency. Beat until light and fluffy.
- Cut cooled cake into cubes or rounds. Layer cake and frosting in jars or cups, repeating until full. Top with frosting and sprinkles or toppings.
- Refrigerate at least 30 minutes to set frosting and enhance texture.
Notes
- Let cake cool fully before assembling to prevent frosting from melting.
- Use a piping bag for cleaner layers.
- Clear jars show off the layers beautifully.
- Store covered in the fridge up to 4 days.
- Variations: Try chocolate cake with mint frosting, red velvet with cream cheese, or lemon cake with blueberry filling.
- Prep Time: 20 minutes
- Cook Time: 30 minutes
- Category: Dessert
- Method: Baked and Assembled
- Cuisine: American
Nutrition
- Serving Size: 1 dessert cup
Keywords: Cake Cup, Cupcake, Mini cake, Individual cake, Portion cake, Personalized cake, Single-serving cake, Small individual birthday cake cups, Personal portion cake dessert, Cute mini cake for parties, Easy individual dessert cups, Delicious single serving cake recipe, Fun cake cups for kids, Best cake cup dessert ideas, Chocolate cake cup recipe easy, How to make cake cups, What are cake cups, Why are cake cups popular, Mini cake recipes, Dessert cup recipes, Baking individual cakes, Party dessert cups, Birthday cake dessert cups, Cute dessert cups for events, Chocolate mini cakes, Vanilla cake cups