DIY Caramel Apple Kit has always been my go-to for adding a touch of homemade magic to holidays and special occasions. I remember my first attempt at making caramel apples from scratch – the sticky mess, the uneven coating, and the slightly burnt caramel smell filling my kitchen. But then I discovered the joy of a well-organized DIY caramel apple making kit, which transformed the entire experience! It’s like unlocking a secret to perfectly coated, delightfully chewy caramel apples every single time. This caramel apple kit for home brings that nostalgic fall feeling right to your own kitchen, making it incredibly easy and fun. Let’s get cooking!
Why You’ll Love This DIY Caramel Apple Kit
- An unbelievably delicious taste that’s way better than store-bought.
- Super quick prep and cook times mean you can enjoy them fast.
- A healthier dessert option, especially when you choose your own wholesome ingredients.
- Incredibly budget-friendly compared to buying pre-made caramel apples.
- It’s a delightfully engaging activity for the whole family to enjoy together.
- This caramel apple kit for home makes the whole process stress-free.
- You can customize toppings to create your perfect treat.
- It’s a fantastic way to bring autumn flavors into your kitchen with this caramel apple kit for home.
What’s in a DIY Caramel Apple Kit?
Putting together your own DIY caramel apple making kit is so rewarding, and knowing exactly what goes into it makes it even better. Here’s what you’ll find in a typical setup, along with why each piece is important for creating those perfect homemade caramel apples. This comprehensive caramel apple supplies kit DIY ensures you have everything you need for a delicious treat.
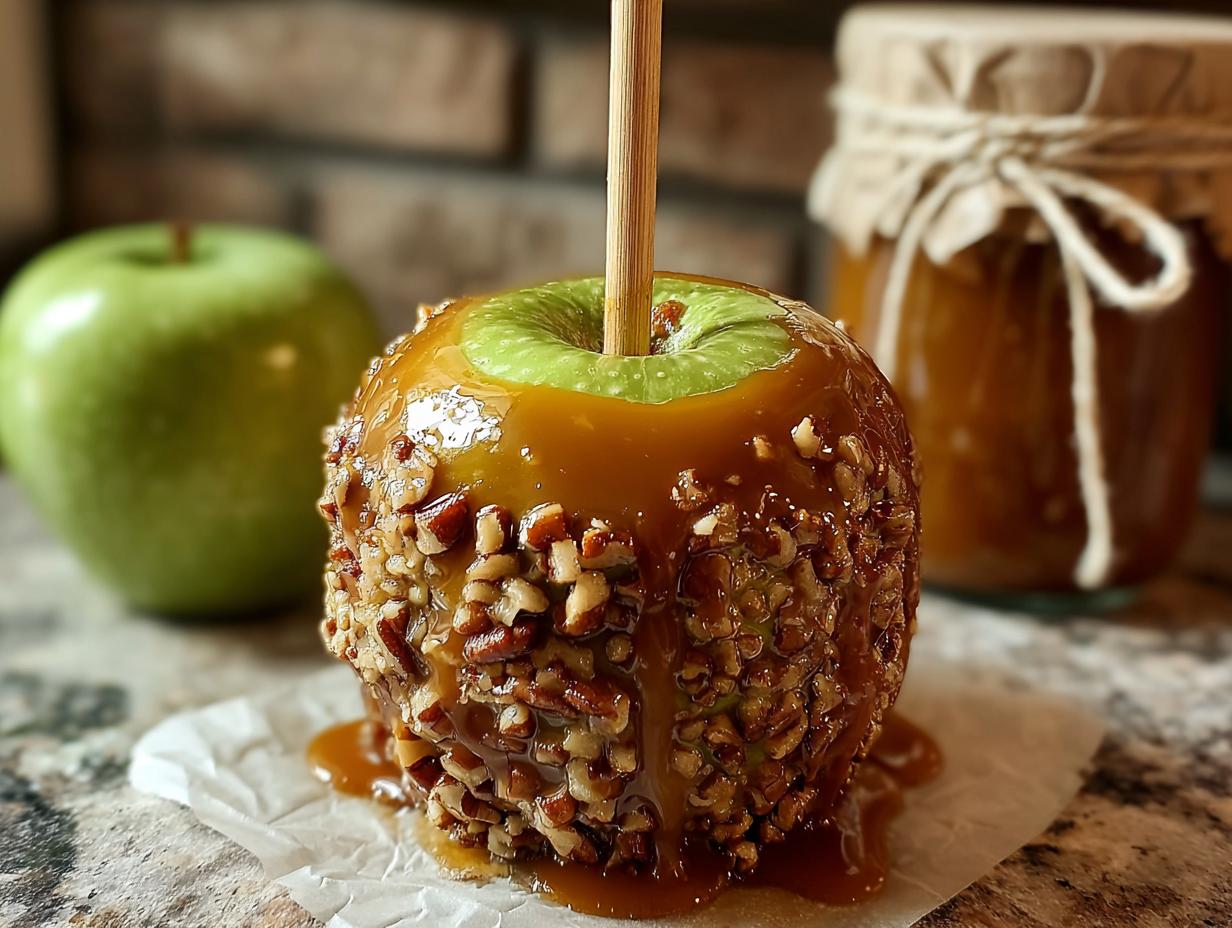
- 1 crisp apple (Granny Smith or Honeycrisp recommended) – The foundation of our treat, offering a perfect tart or sweet crunch.
- 1 wooden stick – Essential for holding and dipping your apple without getting sticky fingers.
- 8–10 soft caramels – These melt down beautifully to create that signature smooth, chewy caramel coating.
- 2 tablespoons chopped pecans – Adds a delightful nutty texture and flavor that complements the sweet caramel.
- 2 tablespoons milk or cream – Helps to thin the caramel, making it easier to coat the apple evenly.
- 1 small jar for packaging – Perfect for presenting your creation as a gift or for neat storage.
- String for decoration – For that extra festive touch when presenting your caramel apple.
- Optional: Crushed cookies, sprinkles, mini chocolate chips – These allow for endless customization and fun decorating!

How to Make Caramel Apples with Your Kit
- Step 1: Begin by preparing your toppings. Finely chop the 2 tablespoons chopped pecans. For an even richer flavor, you can lightly toast them in a dry pan over medium heat for a few minutes until fragrant.
- Step 2: Thoroughly wash and, most importantly, completely dry your crisp apple. Any moisture can cause the caramel to slide right off. Once dry, firmly insert a wooden stick into the apple’s core.
- Step 3: Get a plate ready for cooling. Line it with parchment or wax paper and give it a light spritz of nonstick cooking spray. This prevents your beautiful creation from sticking.
- Step 4: Time to make the caramel! In a microwave-safe bowl, combine the 8–10 soft caramels with 1–2 tablespoons of milk or cream. Microwave in 20-second intervals, stirring between each, until the caramel is smooth and pourable. Let it cool for about two minutes so it’s not too hot to handle. This is a key step for an easy DIY caramel apple kit experience.
- Step 5: Carefully dip the apple into the warm, smooth caramel. Rotate it to coat evenly, then lift it and let any excess caramel drip back into the bowl. The aroma of warm caramel is just heavenly!
- Step 6: Place the caramel-dipped apple onto your prepared plate. Pop it into the refrigerator for about 15 minutes. This chilling time is crucial; it allows the caramel to firm up beautifully, making it ready for toppings.
- Step 7: Once the caramel is firm, it’s time for the fun part! Roll the chilled apple in your chopped pecans, pressing gently so they stick all over. This is where your easy DIY caramel apple kit really shines, allowing for personalization.
- Step 8: Package your masterpiece. Place the finished caramel apple into a small jar for packaging. You can tape the stick to the back of the jar and include a little note with these very instructions. Tie it all up with string for decoration for a truly charming touch that makes this an excellent easy DIY caramel apple kit.
Pro Tips for the Best Homemade Caramel Apple Kit
Want to elevate your caramel apple game? These tips will ensure your DIY caramel apple kit turns out perfectly every time. It’s all about the little details!
- Make sure your apples are completely dry. Even a little moisture can make the caramel slide right off.
- Don’t skip the chilling step! Chilling the dipped apple before adding toppings helps everything adhere beautifully.
- Experiment with different toppings! Beyond nuts, consider crushed pretzels, toffee bits, or even mini chocolate chips for a truly unique creation.
- For an extra smooth caramel, ensure your caramels are soft and fresh.
What’s the secret to perfect caramel apples?
The secret to perfect caramel apples from your DIY caramel apple recipe kit lies in the temperature of the caramel and the dryness of the apple. Using soft caramels melted with a touch of milk creates a smooth, pliable coating that adheres well. For more tips on achieving the perfect consistency, check out this guide on copycat recipes.
Can I assemble a caramel apple kit ahead of time?
Yes, you can assemble the non-perishable components of your caramel apple kit ahead of time. Package the dry ingredients like nuts and sticks in their own bags. Keep the caramels in a cool, dry place. The apple itself is best dipped just before serving, or within a few hours.
How do I avoid common mistakes with DIY caramel apples?
A common pitfall is using wet apples, which causes the caramel to slip. Always dry them thoroughly! Another mistake is using caramel that’s too hot; let it cool slightly. Lastly, don’t over-stir the caramel after melting, as this can make it grainy.
Best Ways to Serve Your DIY Caramel Apple Kit
Once you’ve perfected your creation with your DIY caramel apple kit, it’s time to enjoy the fruits of your labor! These aren’t just for Halloween; they make a fantastic treat any time the autumn mood strikes. For a truly special presentation, consider arranging them on a festive platter as part of a dessert bar, perhaps alongside some warm apple cider or a scoop of vanilla ice cream. This is where the fun of a caramel apple decorating kit DIY really shines – you can layer on even more toppings like crushed cookies or sprinkles for extra flair! They also make a charming and delicious food gift, perfect for neighbors or teachers. You can find more inspiration for easy family dinners that can be adapted for festive occasions.

Nutrition Facts for a DIY Caramel Apple Kit
When you create your own caramel apple kit for home, you get to control the ingredients, but here’s a general idea of what you can expect per apple. This nutritional information helps in understanding the treat you’re making.
- Calories: 280
- Fat: 10g
- Saturated Fat: 4g
- Unsaturated Fat: 5g
- Trans Fat: 0g
- Carbohydrates: 45g
- Fiber: 3g
- Sugar: 38g
- Protein: 2g
- Sodium: 100mg
Nutritional values are estimates based on the core components of a DIY caramel apple kit and can vary depending on the specific brands of ingredients and toppings you choose. For more insights into healthy eating, explore these foods to eat less of.
How to Store and Reheat DIY Caramel Apple Kit Components
Once your delicious caramel apples are made, you might wonder how best to store them to keep them fresh. Proper storage is key for enjoying your Autumn caramel apple kit DIY creations over several days. After dipping and topping, let the apples cool completely on parchment paper before attempting to store them. This prevents condensation from ruining the caramel. Once fully cooled, you can wrap each apple individually in plastic wrap, then place them in an airtight container. They’ll stay wonderfully fresh in the refrigerator for about 3 to 4 days. While freezing isn’t ideal as it can affect the caramel’s texture, you can freeze the assembled kits (apple, stick, toppings, and caramel pouch) for up to 2 months. If reheating is needed, gently warm the caramel portion in the microwave or a double boiler, and enjoy your treat!
Frequently Asked Questions About DIY Caramel Apple Kits
What makes a DIY caramel apple kit so fun?
The fun of a fun DIY caramel apple kit comes from the interactive experience! It’s a hands-on activity that lets you be creative with toppings and decorations. Plus, the satisfaction of making your own delicious treat is incredibly rewarding. It turns a simple dessert into a memorable event.
Can I customize the toppings in my DIY caramel apple kit?
Absolutely! That’s one of the best parts of a DIY caramel apple kit. While the kit might come with classic options like nuts, you can easily add anything you love. Think sprinkles, crushed cookies, mini chocolate chips, or even shredded coconut. Get creative and make it your own!
How long do the caramel apples last once made from a DIY kit?
Once you’ve assembled your caramel apples using your DIY caramel apple kit, they are best enjoyed within 3-4 days. It’s important to store them in an airtight container in the refrigerator. This helps keep the caramel firm and the apple crisp. Avoid leaving them at room temperature for too long.
What’s the best type of apple for a DIY caramel apple kit?
For the best results with your DIY caramel apple kit, choose apples that are firm and have a good balance of tartness and sweetness. Granny Smith apples are a classic choice because their tartness cuts through the rich caramel beautifully. Honeycrisp apples are another excellent option, offering a sweet crunch. You can find more information on selecting the best produce by visiting your local farmer’s market or grocery store resources.
Variations of the DIY Caramel Apple Kit You Can Try
Once you’ve mastered the basic DIY caramel apple kit, why not get a little creative? There are so many fun ways to switch things up and make your own unique creations. These variations are perfect for adding a personal touch, catering to different tastes, or just having more fun with your family caramel apple making kit.
- Dietary Variations: For a dairy-free option, use dairy-free caramels and a splash of coconut milk or cream. You can also explore gluten-free cookie crumbles or nut-free toppings like pumpkin seeds for those with allergies.
- Flavor Boosts: Infuse your caramel with flavor! Add a teaspoon of cinnamon or a pinch of sea salt to the melted caramel for a salted caramel delight. A tiny drop of peppermint extract can also create a festive holiday twist.
- Chocolate Lovers’ Dream: Drizzle melted chocolate (milk, dark, or white) over the caramel-coated apple before adding toppings, or dip the entire apple in chocolate for an extra decadent treat.
- Savory Crunch: Don’t be afraid to mix savory with sweet! Try crushed pretzels, toasted coconut flakes, or even crispy rice cereal for a delightful textural contrast alongside the caramel.

DIY Caramel Apple Kit: 1 Fun Treat
- Total Time: 20 minutes
- Yield: 1 caramel apple kit 1x
- Diet: Vegetarian
Description
Create your own delicious caramel apples with this easy DIY Caramel Apple Kit. It’s a fun Halloween tradition and a perfect food gift, featuring crisp apples, smooth caramel, and crunchy pecan toppings. This kit comes together in just 20 minutes.
Ingredients
- 1 crisp apple (Granny Smith or Honeycrisp recommended)
- 1 wooden stick
- 8–10 soft caramels
- 2 tablespoons chopped pecans
- 2 tablespoons milk or cream
- 1 small jar for packaging
- String for decoration
- Optional: Crushed cookies, sprinkles, mini chocolate chips
Instructions
- Chop pecans into small pieces. Lightly toasting them enhances flavor.
- Rinse and thoroughly dry the apple. Insert a wooden stick into the apple’s center.
- Prepare a plate by lining it with parchment or wax paper and lightly spraying with nonstick cooking spray.
- In a microwave-safe bowl, melt the soft caramels with 1–2 tablespoons of milk or cream until smooth. Let the mixture cool for 2 minutes.
- Dip the apple into the warm caramel, allowing excess caramel to drip off.
- Refrigerate the caramel-coated apple for 15 minutes until the caramel firms.
- Roll the chilled apple in the chopped pecans, pressing gently to ensure they adhere.
- Package the caramel in a jar. Tape the stick to the back of the jar and include a note with instructions. Tie with string for a festive finish.
Notes
- Ensure apples are completely dry before dipping to prevent the caramel from sliding off.
- Chilling the dipped apples briefly before rolling in toppings helps them adhere better.
- For variety, consider adding crushed cookies, sprinkles, or mini chocolate chips as optional toppings.
- Store finished caramel apples in the refrigerator for up to 3 days. Freezing is not recommended.
- Prep Time: 10 minutes
- Cook Time: 10 minutes
- Category: Dessert
- Method: No-Bake
- Cuisine: American
Nutrition
- Serving Size: 1 apple
- Calories: 280
- Sugar: 38g
- Sodium: 100mg
- Fat: 10g
- Saturated Fat: 4g
- Unsaturated Fat: 5g
- Trans Fat: 0g
- Carbohydrates: 45g
- Fiber: 3g
- Protein: 2g
- Cholesterol: 5mg
Keywords: DIY Caramel Apple Kit, Caramel Apple Gift, Homemade Caramel Apples, Halloween Food Gift, Halloween Party Ideas, DIY Halloween Treats, Caramel Apple Toppings, Food Gift Basket